Sunday, January 31, 2016

I like my curves...

Meet Kennedy. She is my second finish of 2016 and it is one WIP less.

Kennedy


Kennedy has been a long time in the making. Let's start from the beginning. Shall we?

I like my Curves. I really do. If I didn't, I would be pretty depressed because I have so many curves. In fact, I am composed entirely of curves - some small curves and some not so small curves!!!
And therefore it was only a matter of time before I embraced (or succumbed to) the magic of curves in quilting.

One day, sometime in 2014, someone at the M* quilting forum asked a question about a pattern involving curves. I answered, based on not my knowledge (I had never made a quilt with curves) but my (inadequate) visualization of the problem. An experienced quilter pointed out the error in my visualization. Darn right, I had no practical idea!!!

Time to set the record straight. How hard can this be? It is not rocket science. What is the worse that I can happen? I might ruin some fabric. I can deal with that :-)

Two fabric squares - about 8" each

Placed one on top of another
Traced Curve
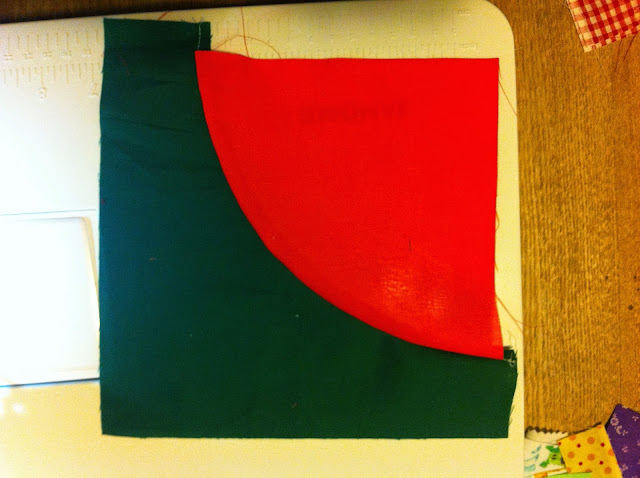
I started with two squares of scrap fabric about 8 inches and started playing. I also used a large mixing bowl.  I placed the inverted mixing bowl on the two squares to draw a large arc.

Cut both along the arc


And I cut along that arc. So far - going according to plan!


Then, I switched the two pieces - the convex (fat) red with the concave (skinny) green and the fat green with the skinny red. Doing well so far!


Going in opposite directions. AARGH!!!

What? How am I suppose to sew these two pieces together if one wants to be in Seattle and the other lives in Miami?

But they do have a common meeting point, in the center of the arc. Aha, that is where I start.
Starting from the middle, I pinned the two together.

Pinned

Very gently and carefully I stitched them together.  The seamy have been a generous 1/4".

Slow Stitching

It is slow but not difficult at all.

Yay, done!!!

Yes, it will need major trimming and squaring.


The experiment was complete!!!

I like these curves. Scratch that - I fell in love with these curves. Time to make few more.  I chose pinks/purples, floral and dots - yes it is girly :-)


Fabric Audition

The blocks came together slowly but surely. It was the piecing of the top that took the longest time.  I could not decide on the layout. When I first started laying out the blocks on my design wall, I had two guiding principles
1. Do not form a complete circle.
2. Match the solids with the prints.

Layout 1

I showed it to Paul and he said  - "Your curves are all over the place. It makes my head hurt."
I replied, yes, it creates more interest this way and then I shooed him away from my design wall. What do you think? Does your head hurt too?

Then I tried another layout.
Layout 2
Although this was interesting, it somehow looked like a very hungry mushroom trying to eat a stand-up mixer.  Once again, I put away the blocks.

Come 2016, I decided that Finished is better than Perfect. Just do it, Preeti. I went with the simplest layout. Circles!!!  I figured the fabric will create the interest and the pattern can be simple. What do you think?

Pieced
Here is the best part of the story. As soon as I started quilting, I also started thinking - What shall I name this one?

Finished

That is when Joyce saw it.

Joyce: Ooh can I have that one?
Me: Sure, you can have anything. But you already have a quilt.
Joyce: Not for me, silly. I have the best quilt in the whole world.
Me: (Blush)
Joyce: It is for Caroline's new baby. She is due soon.
Me: What is the baby's name?
Joyce: Kennedy.

Full Circles

At an angle

Kennedy is Keeley's younger sister. Remember Keeley?
Since the quilt is for Kennedy, may be I should just call it Kennedy. They both took a long time to come together.

Chocolate & Strawberry Dots

Focusing on quilting with curves, I may have neglected my fitness routine. I am going to get a phone call from my Curves (the 30-minute fitness place for women) instructor - Molly. "Preeti, we have missed you. We look forward to seeing you tonight."

Pink Polka Dot Binding

Labelled!

Molly is a sweetheart. I should haul my curves to Curves lest they turn into bulges!!!
Are curves a challenge for you too?  I look forward to your thoughts - both naughty and nice :-)

And I will be linking with my favorite linky parties.  See you in the blogland :-)
Just linked up with Cooking Up Quilts' Main Crush Monday.

Friday, January 15, 2016

Diamonds - Girl's Best Friends

Meet my first finish of 2016 - Diamonds in the Rough!!!

Diamonds in the Rough

Diamonds take a lo........ng time to make.  This quilt is no exception.

I started this quilt in 2014.
One day, while shopping online for a sweater, I noticed the argyle pattern.
Immediately I thought - how would that look in a quilt?

I had never before made a quilt with diamond shapes.  So, this was going to be a new experiment :-)

What is the worst that can happen?
I'll ruin some fabric.  I have plenty of fabric to ruin.

Sew and Cut

So, I started with a few 2.5" wide strips of fabric and started playing.
First, I stitched two strips together and cut them into diamonds.  If two is good, won't four be better?
Only one way to find out.

Of course, I cut one strip set this way and one strip set the other.

Design wall 

And then I started playing with them on my design wall.

I played and played. I could align them vertically or at an angle.
Like these peaks and valleys.

What does that remind you of?
Rise and fall of the waves? Or does it look like the rise and fall of the ECG line on the heart monitor?
Obviously, I had forgotten all about the Argyle by now.

Seams to Match


Before I proceed further, I decided to stitch a few of those diamond strips together. 
Oh boy, that was fun.  I quickly realized that I need to pin 1/4" from the edge of the fabric, on the stitch line of both pieces if I wanted the points to match.


Pinned Properly


I hope these pictures convey what my words fail to do.

Matched Points!!!

In the end, I decided on this layout. Eight simple (may be) diamonds, arranged in a staggered layout.


Final Layout

All I needed to do now, was to fill in with a background.

That was more challenging than I thought. Oh well.

Adding the Background

I proceeded in angles. Not the best way.

Next time, I will take each diamond and place four triangles in background fabric around it - something like an economy block.  That way I will end up with a rectangular shape. Much easy to piece.

Nevertheless, I managed to finish the top!!!  Sorry, I forgot to take pictures at that time.
I took the left over diamond blocks to make a pieced back and I am very happy with that.  I am kicking myself now for not taking more pictures along the way. Grrrrr.....


Let's try something new in quilting. Shall we?
How about using a charcoal thread, instead of a beige/cream one.

Hate the charcoal thread

Quilted a few lines and hated it.

Rip it out

Proceeded to rip them out.  See, I told you it takes a long time (many ups and downs) to create a diamond.

Tweezers to the Rescue

Seam ripper and a pair of tweezers, followed by a lint roller.

Finally, a Lint Roller...
Finally, it is all gone.

Can you believe this? I have pictures of the disasters, not the accomplishments.
Guess you just learned what not to do.

So, now the good news.  I have plenty of pictures of the finished quilt and the back too.

Finished!!!

Since Paul was not around to hold the quilt, I placed it on my design wall, secured with a few pins and took it out for a better daylight picture.  The finished quilt measures about 40" by 57".

I love love love this grey background fabric. But I cannot find it anywhere. It is grey hatch by ModKid. Have you seen it anywhere?

Hello Beautiful

The quilting is wavy lines using just my walking foot.

Love the Blue-Greens on the Grey Background

Yes, I know the diamonds are not uniform. Hence the name - Diamonds in the rough!!!
It does not have to be perfect to be pretty.
Besides, this one quilt taught me several lessons in piecing!!!

Speaking of piecing, are you ready to see the back?

Pieced Backing

I like it  a lot.  And here are a few more pictures.

Wavy Lines Quilting
 I used the same grey for the binding, hoping to create an artsy look to the quilt.
At one point, I considered naming it Desdemona's Jewels!!!

Imagine large shimmering earrings dangling from the princess's milky white earlobes.
What? I have a fertile imagination.

Walking Foot Quilting

Labelled

Girl's Best Friend!!!
I am so proud of this one.  I tried something new. I learned a few things. It is my original pattern.
It is not perfect but I love it.

On Tuesday, I took it to Show & Tell at my Guild Meeting. And, Jennifer asked me to submit it for the Quilt Show.  I was speechless.  But, I want to hear from you.  Your comments make me smile :-)

I will be linking up with favorite linky parties.

Saturday, January 2, 2016

Best of 2015

The last post of 2015 was published on December 31, 2015.
That is my reason for later entry to the linky party hosted by Chery of Meadow Mist Designs. Yes, that is my story and I am sticking to it.


Once again flying by the seat of my pants, skidding past the gates and sliding into the doors,  as the linky shuts behind me. PHEW!!! I made it. YAY!!!

Please take a look at the top five posts from 2015 while I catch my breath :-D

5. How many Shades of Grey - This was a description of my creative space, but it became so much more. I have never had more fun writing a blogpost.

Creative Space - Cleaned up for the Picture
Steps to make Paulitiks Block

Doodle (made during a boring meeting at work)

4. Sugarland Fall Festival - Actually, there are two posts about Sugarland Fall Festival - the buildup and the (anti) climax. I went through a whole spectrum of emotions during that time period.

Assembly Line - Bindings

My Quilts - See the Tent :-)
From frenzy and anxiety to rejection and hopelessness, to feeling very lucky, loved and blessed, to sobering reality that brought me full circle.  I can only hope that these posts capture some of that.


3. Squirrel Kisses - In third place is Squirrel Kisses. Joyce is the love of my life. Yes, Paul knows that. She is my adopted mom, my friend, my guide and my rock.

Lover's Knot Pattern - for Joyce

Squirrel Kisses tries to embody all my feelings for Joyce (love, regards and absolute admiration) into a quilt.

2. How I conquered the Green-Eyed Monster - This is a post about a very simple quilt that helped me come to terms with very ugly feelings.

Blocks for Playschool
This post is special to me because it is about self-examination (being honest with myself) and acceptance (yes, I am jealous) and action (do something about it) and finally emerging victorious over myself (I am not jealous any more).  I'll take that over world domination any day.

1. And finally, my best post of 2015 is about my quilt for me - Homeful!!! 
Quilting for three years and a blogger for just two, this blogpost was my recognition not just from fellow quilters but a quilting icon - Bonnie Hunter.

Homeful

Yes, that is correct.  Bonnie shared my Facebook post on her Quiltville page, praising me and my quilt. I was on Cloud Nine and I am still there today :-)

My favorite block!!!

That is not all. I wrote to her and she even wrote back :-)

2015 has been an amazing journey but more important it was an extremely fulfilling one too. There is absolutely nothing that I would change about it.

Thank you, Cheryl. You just helped me realize that!!!