Meg sent me an email, asking me how I made my zippered pouches. Here is to you, Meg.
My simple instructions for the simplest zippered pouch.
Lots of pictures with captions explaining the step-by-step process.
Simple Zippered Pouch
 |
| Starting Panel - 11" by 6.5" |
 |
| Matching Strips - 2.5" wide, placed on the sides |
 |
| Stitched using a 1/4" seam |
Trim the completed top - panel + side strips to 12.5" by 11".
Switch to a walking foot.
Layer the top panel, with batting and backing. Use basting spray to keep them from shifting.
 |
| Batting |
 |
| Backing |
Now, you can quilt it to heart's desire. I quilted zig zag lines over the two seams and then some gentle curves. See picture below.
 |
| Quilted!!! |
 |
| Trimmed |
Zipper Time.
Find a matching (or contrasting) zipper. Change to a Zipper Foot.
 |
| Wow, perfect match! |
 |
| Quilted Sandwich - Folded in half |
Just wanted to see, how the finished pouch will look. I like it. Ok, moving along.
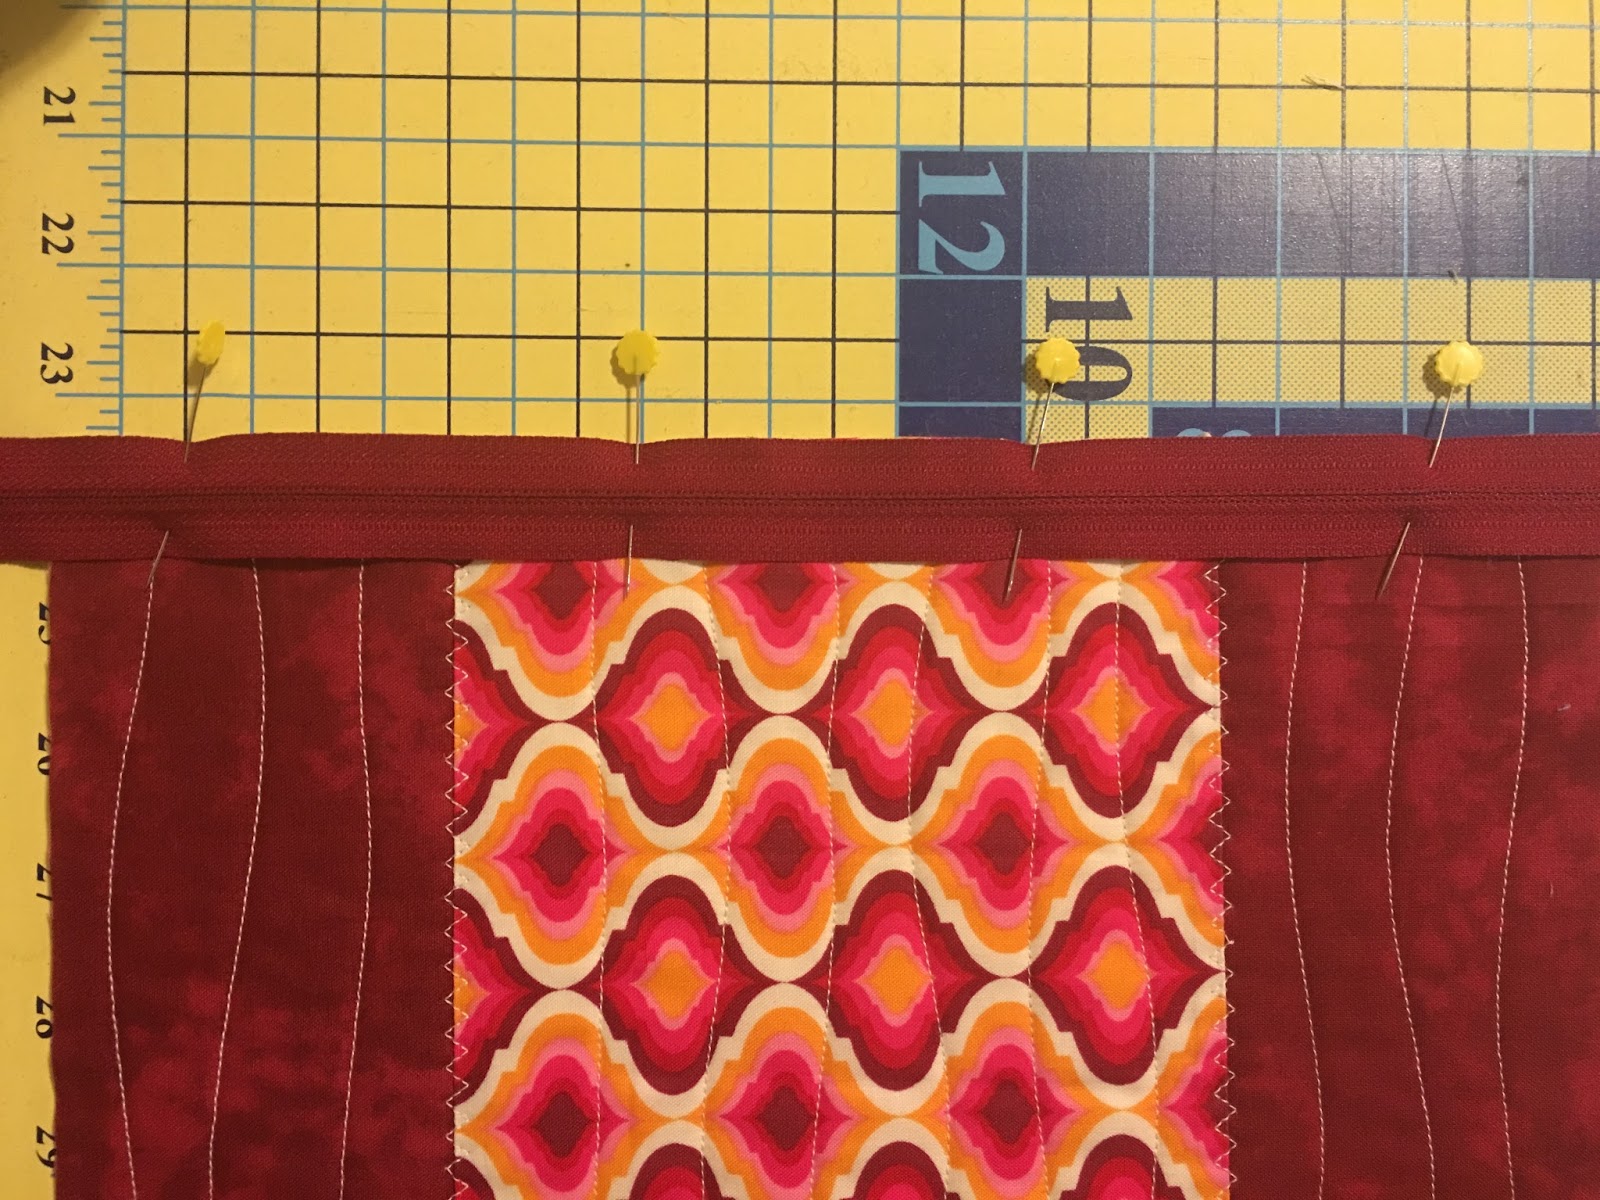
Place the zipper, face down and the zipper pull to the left.
Zipper pull to the left.
Make sure that the Zipper pull is to the left.
 |
| Zipper, face down and Zipper Pull to the left. |
Pin in place. This step is optional. If you are comfortable with attaching zippers, then you may skip it. I want to make sure that I am showing all the steps.
 |
| Pin in place |
Do you have your zipper foot?
Look at the picture below. The zipper foot is attached on the left side, so that the bulk of the foot is to the right. When we are attaching the zipper first time, this is the position we want.
First Stitch - Attach to the left.
 |
| Zipper Foot - Attached on the left |
Go slow, making sure that the stitch line is as straight as possible.
 |
| Attaching Zipper |
This is how it should look. See picture below.
 |
| Zipper - First Stitch Done |
Now, fold the zipper portion and iron it down. It should look like the picture below.
 |
| Zipper attached - Folded and Ironed |
Now, we will top stitch the zipper. Change the zipper foot from the left to the right side. See picture below. Can you see that the zipper foot is now attached on the right side and the bulk of the zipper foot is to the left? That is what we want for top stitching.
Top Stitch - Attach to the right.
Increase the stitch length to 2.4 or 2.6 for top stitching.
 |
| Zipper Foot - Attached to the Right for top stitching |
Since the zipper is to the right side of the needle, we want the bulk of the zipper foot to the left of the needle. That is why we change the zipper foot from the left side to the right side.
 |
| Top Stitching in Process |
Top Stitched. Yay!!!
 |
| Top Stitching Complete :-) |
Are you ready to attach the zipper to the other side of the quilted sandwich?
Yes? Ok, then switch the zipper foot again to the left side.
Fold the quilt sandwich in half, right sides together, so that the zipper pull is now towards you. See picture below.
 |
| Attaching zipper on the second side |
You can pin, if you wish. This time, I will skip the pinning.
 |
| Quilted Sandwich - Folded, RST |
Change stitch length to original 2.2 (or whatever you are comfortable with). Make sure that the zipper is attached on the left side so that the bulk of the zipper is to the right. See picture below.
 |
| Attaching Zipper to second side |
Once again, proceed slowly, trying to keep the stitch line as straight as possible.
 |
| Zipper attached to the second side! |
Open the zipper fully now.
 |
| Zipper Opened fully. Before ironing |
Once again, fold and iron the just attached portion.
 |
| Folded and Ironed |
Ready to top stitch one last time. Increase stitch length to 2.4 or 2.6. Make sure it is the same stitch length as used for top stitching earlier.
 |
| Top Stitching the second side |
There is a lot of bulk under the foot. So proceed slowly, trying to keep the stitch line as straight as possible.
 |
| Top Stitched |
This is the time to do a short happy dance, because you have completed the most difficult part of this process. YAY!!!
 |
| Zipper Attached and Top Stitched |
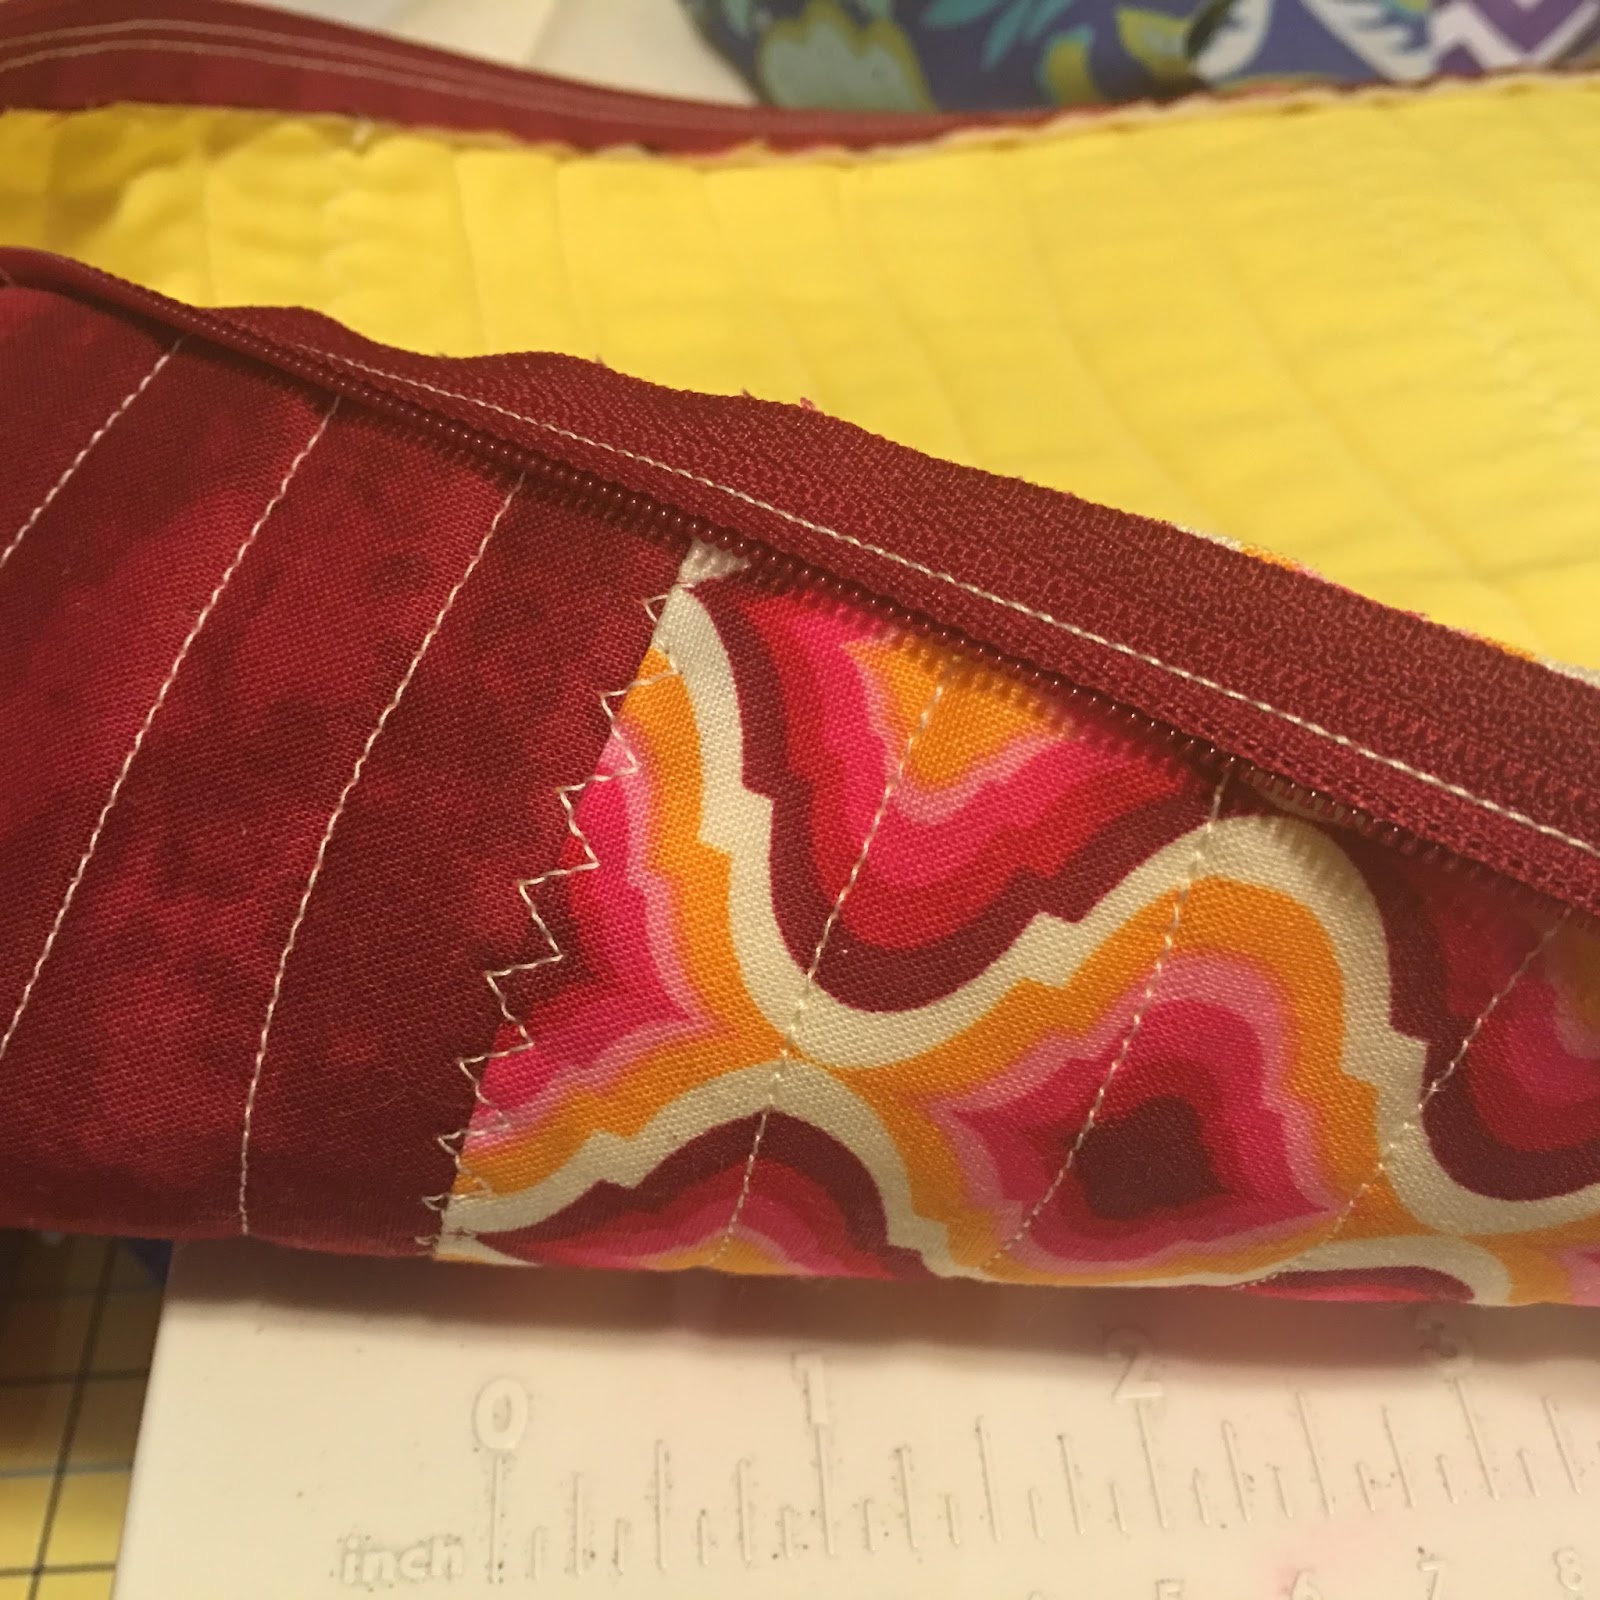
Close the zipper and position it on the top of the pouch. See picture below.
 |
| Zipper on Top |
Now, move the closed zipper down from the top to about one inch towards you. See picture below.
Why, you ask. Well, if you make the pouch with the zipper on the top, it creates a lot of bulk on the corners where zipper ends going the seams. If you move the zipper a bit to the inside, like in the picture below, that bulk is then avoided.
 |
| Zipper offset to the inside |
Pinch the fold on the top of the pouch and place a pin on the inside, along the pinched crease. See picture below.
 |
| Place a pin at that crease |
Half close the zipper and turn the pouch inside out. Place another pin on the other side of the zipper.
 |
| Zipper half Open, Pinned in two places |
Now, we are ready to finish the pouch. Put on the walking foot once again. Leave the stitch length at 2.4 or 2.6. Once again, there will be a significant amount of bulk under the walking foot.
 |
| Walking Foot - Once again |
Stitch, using the walking foot, and 1/2" seam on other sides of the pouch. See picture below.
 |
| 1/2" seam |
Whip it around and stitch again.
 |
| Stitched twice |
 |
| One side done |
Repeat on the other side.
 |
| Stitched both sides!!! |
Trim the excess zipper ends from both sides.
 |
| Trimming excess zipper |
 |
| Trimmed |
Almost done. Just one more step. To avoid bulky corners, clip away tiny triangles from the seams. See picture below.
 |
| Trimmed Corners to reduce bulk |
Now, turn your finished pouch right sides out, press and admire.
 |
| Needs to be Ironed |
 |
| Zipper Closed |
Do you see how beautifully the print above the zipper matches with the print below the zipper?
I am doing a happy dance right now :-D
 |
| Dainty & Useful |
The finished pouch measures 5.25" by 10.5" and it can neatly fit this set of combs. You have a simple zippered pouch!!!
If one is good, two must be better. Right?
Here is a bonus zippered pouch for you.
QAYG Zippered Pouch
I started with batting 10" by 12" and backing 10.5" by 12.5"
 |
| Batting - 10" by 12" |
Layer the batting and backing. Spray baste to keep the layers from shifting.
 |
| Batting and Backing |
Now, comes the fun part. Dive into your strips scraps bag and pull out a few skinny strips - 1.5" wide. We need one strip 2.5" wide by 10" long.
Place the wide strip in the center of the batting+backing.
Add the skinny strips on both sides. Stitch using a 1/4" seam. Flip and iron.
Repeat till the entire batting/backing are covered.
 |
| Gorgeous colors!!! |
Trim the quilted sandwich and follow the same process of attaching zipper as in the Simple Zippered Pouch.
In this case, I left the zipper on the top. See the bulky corners?
 |
| Keeping this one |
So, the process (and size) of the quilted sandwich is different. But the steps of attaching the zipper are identical. If you wish, you can use just one piece of top fabric to make your quilted sandwich.
 |
| Mine Mine Mine!!! |
The bright purple zipper makes it pop :-)
 |
| Pop of Purple |
Do you like it? Are the steps/instructions/pictures clear? Meg? Are you there, Meg?
Tell me all your thoughts. Your comments make me happy :-)
How happy? Like this design wall below.
 |
| Work in Progress - Color Splash on my Design Wall |
Peach, Pink, Orange, Coral, Fuchsia, Blush & Tangerine!!!
These are the colors in my new quilt - a work in progress. Furiously in Progress.
Must finish by May 30th. Details when complete.
I will be linking with all my favorite linky parties.
-----------------------------------------------------------------------------------------------
June 23, 2016 UPDATE
Diana of
Little Penguin Quilts used this tutorial to make a perfect little zippered pouch for her sewing supplies. Do check it out!!!