As soon as I put away the finished Finger Lakes in a gift bag, Paul's voice taunted me.
The rows in the middle had 11 or 13 blocks and there was no way it would fit on the designwall. I moved them to my kitchen bar. Numbering them helped to keep them in order, most of the time.
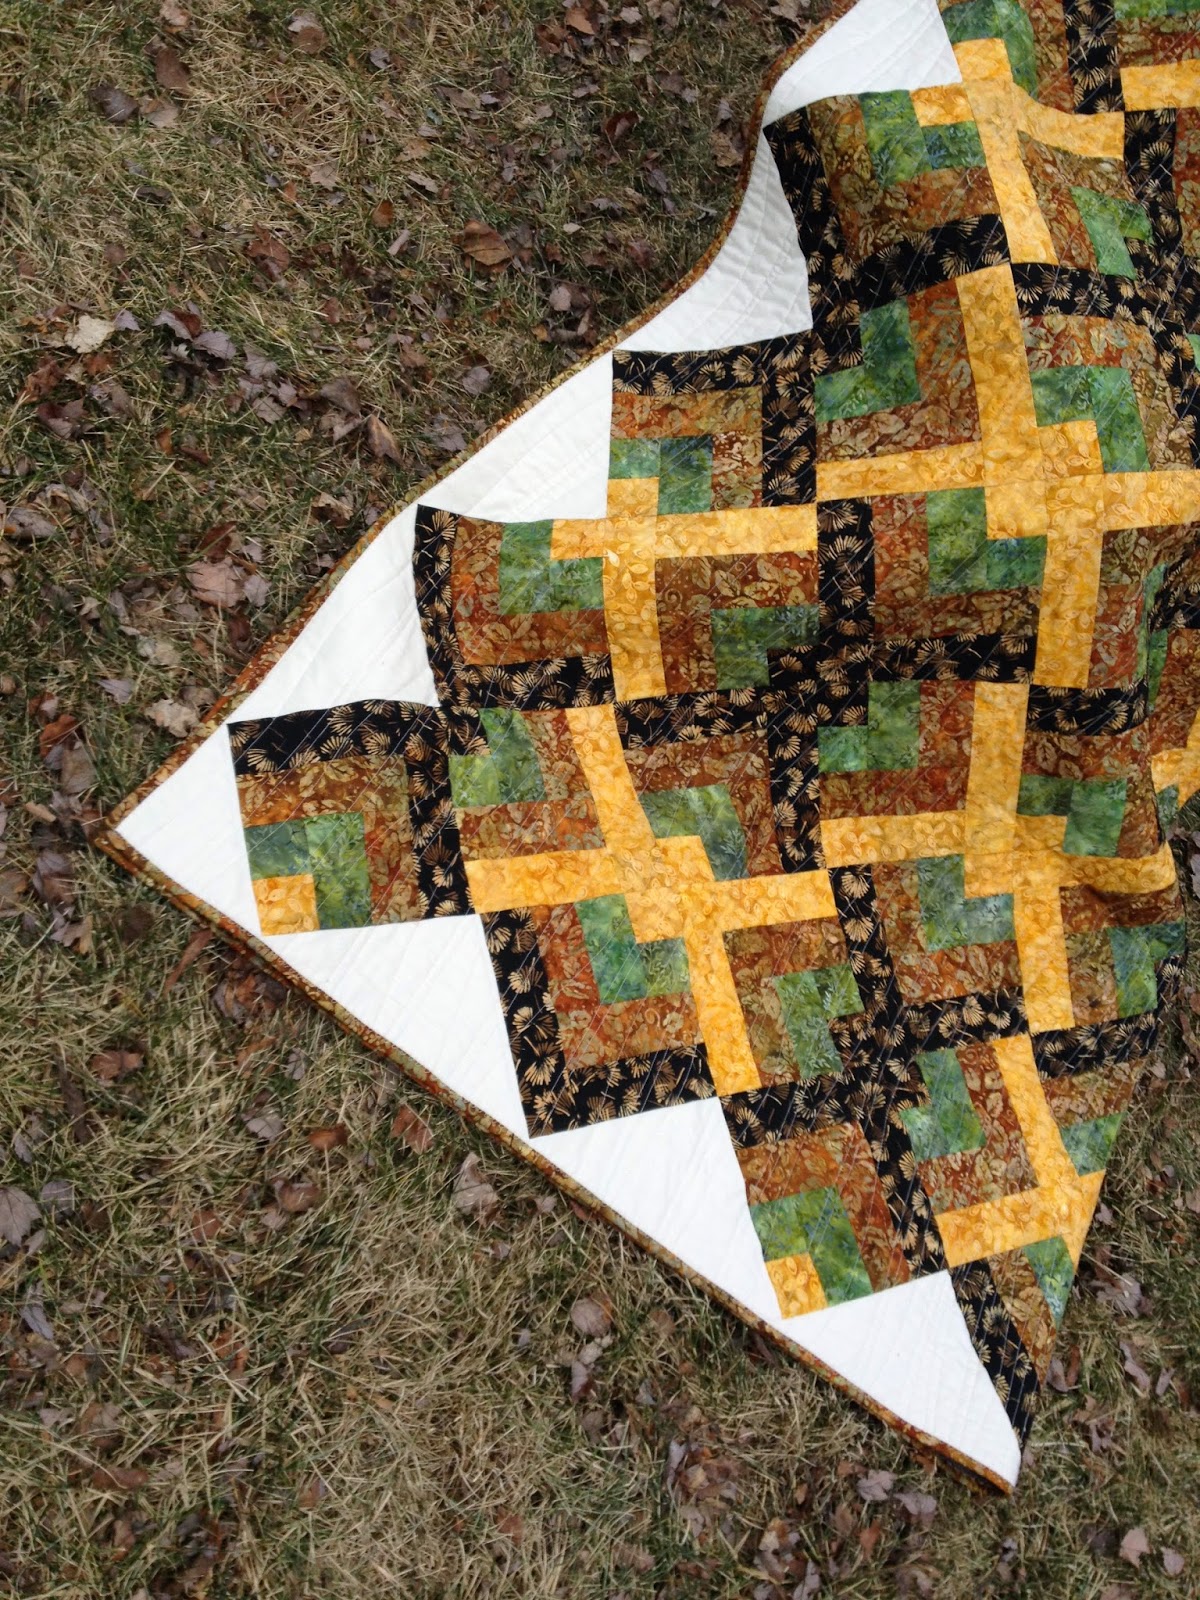
There was some ripping and restitching when it came to the setting triangles. Once the top was pieced I felt triumphant. However, that feeling was shortlived. Very short indeed.
6. Basting - This was the HARDEST part.


Paul: That does not look like Joyce's quilt. Is it?
(Paul knows that I promised Joyce a quilt. He also knows that it is late. Christmas Day Deadline came and went.)
Me: No.
Paul: Aren't you supposed to finish that one.
Me: Yes. I have finished quilting it.
Paul: Once you finish quilting, is it not finished?
Me: No. After quilting there is binding and labeling, burying the knots etc.
Paul: So why aren't you working on her quilt.
Me: I had to finish this one for a baby shower at work. Get off my case.
Paul: When are you going to finish Joyce's Quilt?
Me: Valentine's Day. You know that Joyce is the love of my life!!! (It was my turn to taunt him.)
Today is Valentine's Day and here is my 30th quilt (3rd of 2015) finish. Meet Squirrel Kisses. I will be linking to my favorite linky parties (See list on the right).
 |
| Squirrel Kisses |
Before I talk about Squirrel Kisses and the process, I have to mention Joyce. Joyce is my adopted American Mom. She is also my best friend and confidante. Joyce has been there for me at all significant moments in my life. She was there at my wedding (BTW, she highly approved of my choice). The day I became an American citizen was a very emotional day for me. As I was sobbing uncontrollably, she was there comforting me and later celebrating with me!!!
 |
| Joyce's Colors |
When my mother, who lives in India, visited the US she met Joyce. She is happy and thankful that I have someone closer to me for motherly advice. When Joyce asked for a quilt, I said YES, of course. I would love to make you a quilt. What are your favorite colors? How big? Do you have a favorite pattern?
Joyce likes traditional patterns. She almost frowned when I showed her my Coming of Age quilt. Her favorite colors are fall colors. No, not the bright ones like I used in Curry Favor. She prefers a more muted palette. Joyce was definitely clear about one thing - the quilt had to be Queen Size for her bed.
I showed her several patterns. She seemed to lean towards the Log Cabin patterns and finally decided on the Eleanor Burns' Lover's Knot pattern.
My work was cut out. This was going to be a challenging quilt for so many reasons.
1. This was a HUGE quilt.
2. I did not particularly care for the pattern.
3. I did not like the colors.
I needed a plan of action.
1. Make the quilt layout. Since the pattern was chosen and the fabrics were bought, I needed a blueprint for the quilt layout, so that I knew exactly how many blocks of each kind were required.
 |
| Quilt Layout |
Preparing this paper-pencil layout (in a very traditional style) was the best thing I did.
There are two kinds of blocks in the Lover's Knot quilt. I am calling them A and B in the layout.
2. Make the blocks. Based on the layout I needed 63 A blocks and 48 B blocks. I also needed 28 setting triangles and 4 corner triangles. Now, EB has a way of making these blocks. I wanted to deviate just a little bit from her method. The end result would look almost the same, but the process would be a bit more streamlined. Let me explain.
 |
| Block B - Construction |
In the traditional method, you start with two strips - one black and one green, stitched together and cut into 2.5" segments. Next you stitch the 4.5" long green strip to the right, followed by the 4.5" long brown strip to the bottom. Next you add the 6.5" brown strip to the right followed by the 6.5" yellow strip on the bottom. The 8.5" yellow strip is added last.
I did this just a bit differently.
- I stitched together strips of green and black together. Cut them into 2.5" segments (Same as EB)
- Next I stitched together strips of green and brown and cut them into 4.5" segments (Sew first, cut later). Added this strip set to the right.
- The third step involved sewing together of brown and yellow strips and cutting those into 6.5" segments. Added this strip set to the bottom.
- The last step was adding the 8.5" yellow strips to the right (same as EB)
You can see this in the picture above. If this is too confusing, you can skip ahead. I made a total of 111 blocks. WHEW!!!
3. Squaring the Blocks - This was the most tedious part of the whole process.
 |
| Squared Blocks |
I would square 10 blocks at a time and then do something else. The fabrics looked dull. I was uninspired.
4. Make the setting triangles - I cut 7 squares of 13" side from the background fabric. Then cut these squares twice along the diagonals to get 28 setting triangles. This method ensured that the outside edges were on the straight of the grain. For the corner triangles, I cut 2 squares of 6.5" side and cut each once on the diagonal, so the the outer edge was on the straight of the grain.
5. Piecing - Since this quilt pattern has blocks on point, it had to assembled in diagonal rows. At this time, the layout diagram was pure gold!!! I was ready to piece. I placed the blocks (just a few) on the design wall.
 |
| Just playing - a fun layout |
NO, this is not the layout. This is just me exploring other layouts, trying to get excited about this project. Don't you agree this layout is more exciting than the Lover's Knot? Even Paul agreed, for once.
Sorry, but no. Whatever Joyce wants, Joyce gets. Back to the job at hand.
 |
| Piecing in progress |
The design wall was important, so that I could make sure that the blocks were oriented correctly to make the "knot". The yellow knots had to be horizontal and the black knots had to be vertical.
The challenge comes from the fact that the design wall could only accommodate the first few (and the last few) diagonal rows. Here was my strategy - put together the first five rows and stitch them together. Next make and stitch together the middle four rows. Lastly put together and stitch the last 6 rows together.
 |
| Setting Triangles added to First Block |
 |
| First Corner Triangle Pinned |
Fold the setting triangle in half and finger press the mid point crease. Pin the crease to the mid pointof the block. It helps to align the setting triangle to the block correctly.
 |
| Piecing On the Kitchen Bar |
 |
| Keeping the rows numbered!!! |
There was some ripping and restitching when it came to the setting triangles. Once the top was pieced I felt triumphant. However, that feeling was shortlived. Very short indeed.
6. Basting - This was the HARDEST part.
If I am working on a small quilt, I can baste it on the kitchen bar, in sections. If the quilt is larger, I can do it on the floor. Floor, it was.
Yes, that pathetic creature on all fours is ME. I moved all the furniture to the corners. Swept and mopped the floor. Basting just the batting to the flannel backing took a couple of hours. I was perspiring and out of breath. And that was the easy part.
I tried to baste the quilt top to the batting and could not keep it smooth and wrinkle-free. Paul saw my plight. First, he took some pictures. And then he decided to help me. Gotta love the guy!!!
We, Paul and I, nailed the quilt sandwich to the wall of our dining room. That took an hour, at least with Paul using the hammer/nails and me holding the chair and handing him the nails, as required.
It was my turn to sneakily click a few pictures of him!!! Once the quilt sandwich was basted, I let it stay on the wall for three days. Why? I wanted to admire my handiwork.
I also was busy. The work week was upon me. And most importantly, I had no clue how to quilt this monster of a project!!!
7. Quilting - The quilt sandwich was about 80" wide and 103" long. There was only one way to manage this bulk on my 4120 QDC Janome. Quilt it along the length only. That way the maximum bulk in the neck would be about 40".
Yes, quilting straight (somewhat) lines in one direction was the only way I could quilt it. This had its own challenges. This meant that the quilting lines would be very long. Whenever I stopped and started, the lines would be anything but smooth.
I took a deep breath (several of them) and wound four bobbins. Told Paul to fend for himself and give me a free pass so that I could concentrate on quilting.
 |
| Filled 4 bobbins for one half of the quilt |
 |
| Quilting Detail |
The modified quilting process went like this - stitch one line, move to the right a couple of inches and stitch another straight line. Come back and stitch a gentle curve in between the two lines. Repeat many times. When my shoulders and neck ached, I said aloud - I love you Joyce, I love you Joyce!!!
 |
| Flannel Backing, showing the quilting |
It took me 8 bobbins and two days of ignoring all chores to complete the simplest quilting. But I did it. Yay Me!!! Time for a little happy dance. Yes, this was a major accomplishment. The fact that it took less than one spool of Connecting Threads (CT) thread to do all that quilting is simply amazing. On a side note, quilting is not a cheap hobby but CT certainly makes it affordable!!!
8. Binding - This is the easy part. As my Mother would say - the elephant has passed, just the tail remains. I used strips from the brown batik fabric for binding. It took 10 strips. Stitched to the back of the quilt, brought it to the front and stitched it using my favorite squiggly stitch.
 |
| Binding Detail |
9. Label - Used freezer paper ironed to a fabric rectangle to write the quilt name, recipient's name, my name, year etc. Then stitched it face down with a piece of flannel on all four sides. Trimmed the corners. Made a slit in the flannel fabric and turned the whole label inside out.
Here are a few pictures describing the process.
 |
I feel that doing this process provides a neat little channel for the stitches when I hand-sew it to the quilt back. Yes, that is the only hand-sewing I do!!!
And that is it. It is done. I finished it. I really did. By golly, this has been the biggest project so far. Here are a few more pictures!!!
When I showed the quilt to a member of my quilt guild, they oohed and aahed. They always do. It is so encouraging. But Julie said the best thing - Your quilting provides a modern touch to this very traditional pattern. I gave her a big hug!!!
 |
| In my front yard |
Next time, I make a quilt this size, I will likely ask Julie to quilt it for me on her long-arm machine. I know what you are thinking - why would you ever make it again. It was such a challenge and at every step. You are probably right. I probably won't...unless Joyce asks for it.
After all, it is Valentine's Day and won't you do anything for your loved one?
Bravo to you for sticking with this project! I think it turned out beautifully. What a great story. I really like how you floated the design on the white triangles, and I love your quilting solution. I bet you are glad you didn't ask her how she wanted it quilted. But what a labor of love!
ReplyDeleteA labor of love! This is beautiful and shows what a dear friend you have in Joyce.
ReplyDeleteWhat a wonderful quilt. I love the colors and the design. You should be very proud of your accomplishment!
ReplyDeleteGreat work, Preeti! I like the colors, they are rich without being opulent. The gold/yellow reminds me of the sunlight on a late fall day. - Sylvia H
ReplyDeleteWow, as others of said, a labour of love for sure! I like the quilting style you decided on.
ReplyDeleteI can't wait to hear what Joyce thinks! The squirrels are kissing with glee *mwah mwah mwah mwah mwah*! I have a new saying to use, "the elephant has passed, just the tail remains"! You're quilt making precision and delightful writing dazzle me.
ReplyDeleteBeautiful fabric and quilt! Thanks for sharing on Sunday Stash ... :) Pat
ReplyDeleteI love it! And you did an amazing job. I appreciated all your process shots and the story. I think it is wonderful you were able to finish it, and your quilting is perfect for this quilt.
ReplyDeleteWhat Jasmine said!! I love reading your posts, Preeti - informative AND entertaining :D Congrats on a BIG finish :) I'm going to guess that Joyce loves her quilt. I agree, those blocks were pretty uninspiring but the quilt is awesome! Amazing how that happens isn't it?
ReplyDeleteBig quilts ARE a challenge. Love your post. ;)
ReplyDeleteNice work! Thank you so very much for sharing the process as well as the gorgeous finished quilt!
ReplyDeleteMarvelous Job! I do have another way to put those large quilts together without getting on the floor!!!!
ReplyDeleteusing boards...look on my Pinterest: Lana Dunkerley IT has SAVED my KNEES!!!
Thank you, Preeti, for stopping by my blog and leaving a kind word on my Easy Lattice Baby Quilt tutorial. If you try this technique, please let me know how it works for you.
ReplyDeleteDo you know you are a "no reply" blogger? I would have sent and email response to your comment had I been able to do so. If you would like to receive more responses to your comments from other bloggers, it is an easy fix. Bonnie Hunter at Quiltville has a good tutorial on how to fix this here ...
http://quiltville.blogspot.com/2014/08/are-you-no-reply-blogger.html
Happy quilting ... :) Pat
Wow, wow, and more wow! Preeti! That's one incredible work of art and love . What a delightful name, too. So the batting did not pull away from the nails with the force of gravity, huh? Your precious husband, God bless him for helping. I can just feel your aching backs and knees.
ReplyDeleteI like the colors and pattern. The fabrics work very well together, but I know what you mean about working on a quilt that isn't "you" . That makes it even more a labor of love, I think. But somehow, when that quilting and binding go on, it all changes. I just finished one I didn't like in each stage, but now that's it's finished, I do. And the recipient will, too.
Can't wait to hear Joyce's reactioin!
It's beautiful: a real labour of love. Half log cabins in batik: East meets West: appropriate and wonderful!
ReplyDeleteIncredible story and an amazing quilt. Congratulations on this gorgeous finish, Preeti! Love the white setting triangles and the quilting. Joyce is a lucky girl!
ReplyDeletestunning quilt!
ReplyDeleteYou did a wonderful job!!! I, too, struggle to quilt the big ones, but each one gets easier,,,,don't give up!! This is a beautiful labor of love, and I just know Joyce loves it!!!
ReplyDeleteBeautiful quilt. I have made placemats with this pattern but never a quilt. You did an excellent job and your friend will love it for a long time. Just think every time she pulls it up around her she will think of you. I like the way you made your blocks also, had to be faster then the traditional way. May have to give it a shot.
ReplyDeleteI actually think the Lover's Knot looks nice :) I think it is wonderful!
ReplyDeleteI really enjoyed reading about your quilt process. I have had many a quilt that I did not care about much while making them, but once completed they really started growing on me and liked the end result. I am sure Joyce loved her quilt especially since you made it for her. Thanks for linking up to TGIFF.
ReplyDeleteOh, it's beautiful! I know your pain with quilting - I also tend to make enormous quilts and then struggle with the bulk issues. But your solution is so impressive!
ReplyDeleteThank you so much for this tutorial. You make it look do-able. This is now on my list of soon to do quilts. Could you share how much fabric I will need to do a queen sized quilt.
ReplyDeleteI am so glad that you found it useful.
DeleteI had two yards each of yellow, green and black batiks. I had three yards of brown. I used brown for the binding as well. I had one yard of light beige for the setting triangles. You will have some fabric left over but not much. The finished quilt is 80 by 103, which is queen size.
If you have any other questions, please let me know.
Beautiful quilt Preeti! I love the pattern and the colors. If you ever decide to make another large quilt, Ann Peterson, on Craftsy, has a wonderful tutorial. She makes it so much easier to do and manageable! It's worth the money to get the tutorial and you will have it forever to refer back to. Love your blog. I often read it with my morning coffee, after I nose around MSQC and of course the daily deal!
ReplyDelete