Sunday, June 29, 2014

Keeley

Joyce's niece was expecting a baby girl and I was invited to the baby shower. Excited, I made the baby blankets, burp cloths and bibs for her, tied them into a neat little packet with a golden ribbon.


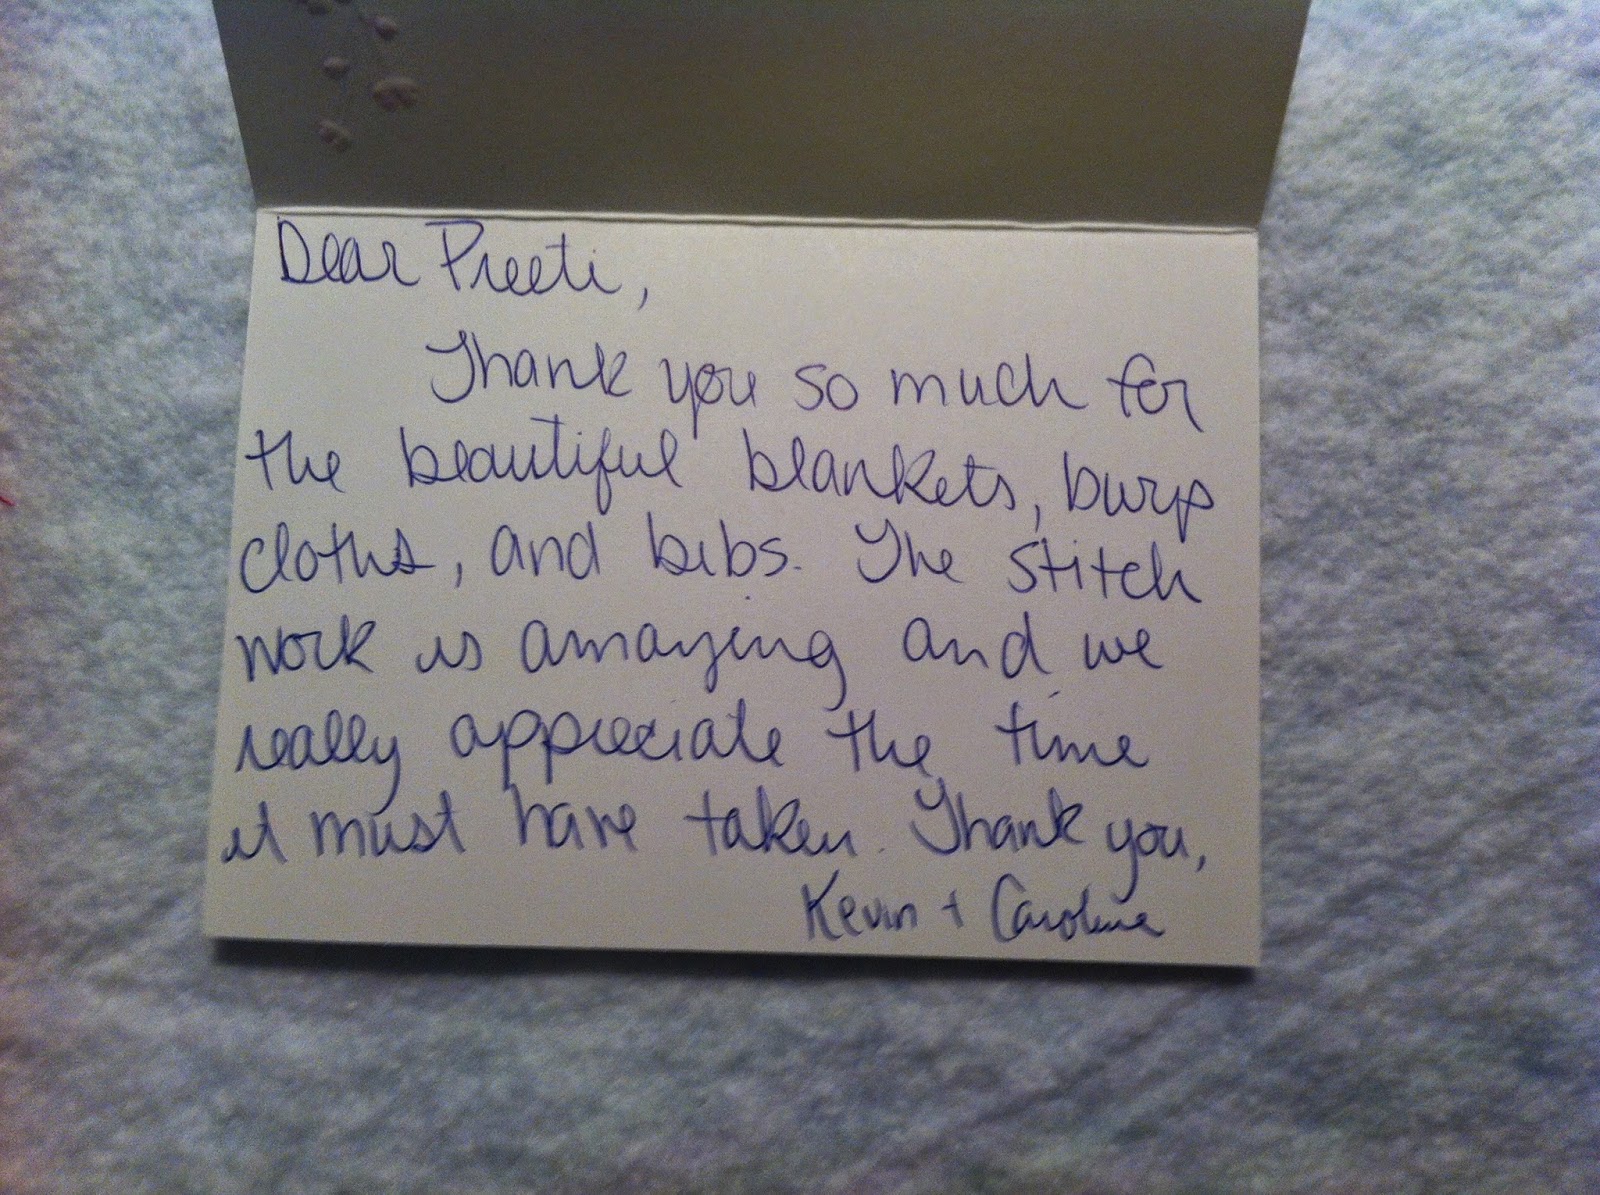
And then the threat of a snowstorm (so many this past winter) kept me from attending the shower :-(
I gave the neat little packet to Joyce and eventually, the parents got the blankets and they sent me a Thank you note.


I was touched. A few weeks after the baby was born, I received an email from Joyce - the blankets and burp cloths were a big hit. What tickled me even more was their request - could they have two more of those baby blankets and burp cloths? ABSOLUTELY. Next day, I mailed the baby blankets + burp cloths. What did Joyce do in return? She sent me a check. Horrible Joyce!!! I called Joyce and asked her, why did she do that? She replied because she wanted to.

Do you know what I want to do? Of course you do. I want to make a quilt for the baby. Now, only if I knew her name. So I sent a text to Joyce.

The conversation in text went as follows:
Preeti - What is the baby's name?
Joyce - Newley
Preeti - Newley?
Joyce - Keeley, Keeley, Keeley is the baby's name.

It is obvious that my friend was frustrated (a bit) with her auto correct function on the iPhone. I still have not met Keeley but I already love her. May be, her quilt should be like little love notes or little postcards.

When I saw "Postcards from Hawaii", I knew  immediately - that is it. I am going to make that quilt (or something inspired by it). It is a simple, easy to follow, quick-to-put-together design and can be made from scraps too. Stitch together two strips of fabric - one floral and one white and cut them into squares. Stitch them in columns add sashing and you are done!!! So, let's make it a teensy weensy bit complicated. I decided to add letters into the pattern - letters that would spell K-E-E-L-E-Y.
Stumbling along with the alphabets!!!
The Es were easy. However, all three of them look slightly different. It took great skill (ha ha ha...) to give them their unique wonkiness. The L was super easy. The Y was difficult - took two tries to get it right. And the K was the problem child. In fact, I took one of the discarded Ks and used it to fashion the Y. Now, the Y is not perfect either. But then I did not set out to make anything perfect. In fact, I am the queen of wonky and I love it...
Keeley - Finished Top
See you don't really see the wonkiness from here!!!

I chose a floral pattern for the backing and pieced purple binding (from jelly roll strips). I used a decorative (looks like Cs) stitch for the quilting. This stitch can be mirrored. If the first line was Cs, I mirrored the next - makes it look like clouds :-)

 Go ahead, take a closer look.

My painted toes peeping through the grass are a bonus :-D

And here is the label...
Hope I get to meet Keeley soon!!! And then I will take a picture of Keeley with her personalized quilt and update this post - of course!!!

And I almost forget. This is Quilt # 20!!! Doing the happy (wonky) dance!!!
I 'd love to hear your thoughts  on wonky?

Sunday, June 22, 2014

My Experiment with Modern Quilting

What makes a quilt "Modern"?
There are definitions, explanations and examples galore. Here are a few key points (in my opinion)
  • Lack of obvious symmetry
  • Negative spaces
  • Use of solids
  • Departure from "blocks repeated to make a quilt" (thinking of the quilt as whole and not as a result of repetitive blocks)
Over the last few weekends, I discovered "the process" of making a modern quilt. I was working on a simple rail fence baby quilt for a shower. When I finished making the blocks for this traditional rail fence quilt, I had some slivers left over. Scraps that were too large to throw away and too small for anything else.


What can you do to salvage little scraps?

1. Make them larger so they are a little more usable. I added some grey fabric to turn each of these slivers into a four square strip.
2. Then I stitched four of those strips to form a 16-patch. Looking good. I had a total of 13 blocks.


Once again, too small for a quilt. Yes, I could make 13 mug rugs!!! Jokes apart.
3. What can I do with 13 blocks that would turn them into a quilt? Add negative space.
And "adding negative space" took several iterations. See my attempts below:


A - Floating Blocks - The white squares separating the blocks and then white sashing and border. A simple and quick layout. Great!!! This would only need 12 blocks so I had one extra. May be I will make a Mug Rug, but that is another post.
Going back to the layout, I noticed that there wasn't enough contrast between the white in the blocks and the white of the background negative space fabric. And it definitely lacked the wow factor!!!

It remained on my computer. I did not take it to the design wall.


 B - Double Steps Layout - Good Layout. This was definitely an improvement upon "Floating Blocks" because I liked the contrast between the background charcoal fabric and the blocks. Although it was visually appealing, it seemed that it could be more than just that. Somehow, this layout was not fully utilizing the potential of the blocks and the negative space.

Paul suggested that I add a block each in the top right and the bottom left corners. I disagreed. It would only make it more symmetrical and that symmetry (which can be sometimes due to lack of imagination) was what I was trying so hard to avoid.

Most important - I HAD ONLY 12 BLOCKS!!! I did make that mug rug.


C - V-Layout. I think I like it even less than the Double Steps. It can be interpreted as a zipper, or a meeting of the minds (good one). Looking at it from another perspective, it might as well be "going separate ways" or a "flight of birds". In any case, I did not want this quilt to be a "Hail to the Vee".

I was mentally exhausted by now. So, I gave myself the following not-so-peppy talk
It is a creative process and you will evolve as you keep designing and making more quilts. Just go ahead and finish this one and when you have another great idea, make another quilt. But for now - FINISH IT!!!

I obeyed my inner voice and cut white fabric to fill in the negative space for the V-Layout. I stitched the charcoal fabric on the outside and the white fabric on the inside of the blocks. The idea was to construct the quilt in columns and then stitch the columns together. Once all but one column was completed, it looked BORING, dull and uninspired. And this made me unhappy. I wanted to cry :-(

What if you mix up these columns?  And that brings me to Layout D

D-1. Looks better - mixed up and has more visual interest


D-2. For some reason, and I am not sure what, this looks better to me than D-1.

Oh, I see. In this case the way the 16-patch blocks interact with each other is different.  In D-1, all 16-patch blocks are touching corner to corner. In D-2 they touch corner to corner, but also are separate and even overlap in one place. May be this is the visual interest that my eyes were seeking.

I feel I am almost there. Just one more thing. In the third column where the two 16 patches are touching, I needed to insert a band of white to maintain the continuous flow of white from left to right. Why? I don't know - it just would LOOK right.


Here is the finished top. (What a difference - I should take all my pictures outdoors)


So, the process of making a modern quilt is complete. Right?
WRONG!!!

Look at all that negative space. How am I suppose to quilt all that??? Is this going to be a UFO? No, help!!! I do not FMQ. I do not have a foot that can FMQ. I only have a Walking Foot. I look forward to your suggestions.

Update July 18, 2014
I finished it. Yes, I quilted it and the finished quilt is here.

Sunday, June 8, 2014

My first commission...

Lily's friend's son's wife was expecting a baby girl. The parents-to-be made the announcement with a beautiful photograph. Lily asked me if
1. If I could make her a quilt for the baby shower in June - Yes, of course. I would be happy to do that.
2. If I could incorporate the announcement picture in the quilt - Hmmm, I have never done that. Let me research a bit.

Oh, the colors of the nursery are teal, grey and lilac.
What??? Teal and grey are boyish colors, I thought. But then, I like teal and aqua. And isn't it time we moved away from the strict stereotypes? Yes it is.

Here are the colors I chose for the quilt.
Teal and Aqua

I also discovered Spoonflower. If you are a quilter then you may have already heard about them. If not, I urge you to look them up. You can design and print your own fabric. And there are fabrics created by other designers that will make you swoon. Pricey, yes. But, if you want something specific printed on fabric, Spoonflower is the place to go!!!  Spoonflower transferred/printed the announcement picture to a small swatch of fabric. I added borders to that picture and was ready to incorporate into the quilt.

I suggested to Lily that instead of placing the picture in the center of the quilt, move it to the top left or top right corner of the quilt. That way when the baby is sleeping or playing on the quilt, it can give the appearance that the parents are watching over her. Placing it in the middle would just cover it. Lily agreed.

Backing (Print) and Binding (Lilac)
For privacy reasons, and because I promised Lily (not her real name) I will not share pictures of the finished quilt or the announcement picture. Lily thinks everyone reads my blog ;-D
Well, someday, everyone will. A girl can hope :-)

I showed Lily the first few blocks I made. She loved them. Yes, she was beaming and then she hugged me. As I was putting away the blocks and picking up my bag to leave, she said  - Can I get another hug???

Another hug - Yes, as many as you like. Such a wonderful feeling, that my work can bring someone so much joy...

Yesterday, I gave the completed quilt to Lily. I knew she would be happy. But all the oohs and aahs and hugs and appreciation that this quilt received put me over the moon. Here is the icing on the cake - Lily said "I love this quilt and I love you"

Only if, I could get a fraction of that appreciation in my day job, my life would be complete. I may write a report that is well-received. But the best response would be - "good work" or "nice report".

I like my job and I am not complaining. It is just the stark contrast between the feedback I get from making my living (my job) and the appreciation I get from pursuing my passion (quilting) that is astounding. I cannot pay my mortgage by making quilts. And therefore I will continue with my day job for another 22 years, or so. 22 years and I am looking forward to retiring.
So that I can quilt full-time...

If money was not an object, what would you do?


Sunday, June 1, 2014

It was my first time...

...and it was a terrific experience.

I met Jennifer only last week and we bonded instantly.
It is my first and I am so excited, I told her.
She gave me a big smile and we decided that we would do it together.

On Saturday morning, I wore my pretty dress and arrived at her house at 9:30 and she took me to my very first Quilt Show!!!

Quilters Unlimited of Northern VirginiaVirginia is composed of 11 chapters including Annandale, Arlington, Burke, Centerville, Fairfax, Haymarket, McLean, Mt. Vernon, Reston, Springfield, and Vienna. The following pictures are a small sample of the quilts displayed at the 41st Annual Quilt Show of Quilters Unlimited.


This was the first quilt that made me take out my iPhone. The name of this quilt is Moon Glow. The bonus - I got to meet the quilter :-) 


This was one of the quilts from Reston Chapter's Challenge Quilt. The theme of the challenges was - "My mother always said...". 

The title/explanation that came with this quilt read - My mother used to say - Always wear clean underwear just in case of an accident. The quilter creatively shows an explosion of underwear at the scene of the crash.

The next two pictures are of the quilt that Jennifer made. She chose a difficult pattern with inset seams and then added complexity by placing it on point.


This chilli pattern had me smiling - how playful!!! Because you are so hot!!


Look at the quilt - colorful and playful. But don't miss the little guy who is hanging by a thread - literally!!!! 

This was one of my favorite quilts at the show

Why do I like this quilt so much? Because the pattern, the colors and the paisley fabric all work so well together and more importantly - It reminds me of India!!!


If the quilter was aiming at Perfection, consider this quilt as Mission Accomplished!!!

Fractured Rainbow - it is not just art. It is Patchwork Engineering.

This is the BEST specimen of quilting I have ever seen!!! Enough said.


Wheels of Time - Reminds me of Stone Carved Hindu Temples in India!!!

And then again, I am drawn to the simplicity of this one...


How can you create an intricate pattern with a simple block? It takes GENIUS!!! Another one of Jennifer's Quilts

Maypole Dance by Jennifer!!!


Rail Fence with a Simple Twist

Starburst
Simple and Stunning. Why do I like simple designs so much?
They are the ones that encourage me and other new (younger) quilters to take up Quilting. Yes, it is simple so you can do it. It is beautiful so you want to make it.


And now we come to the Show-stopper of the Show. This is just my opinion. If I were the judge this quilt would win First Place.

Blue and White - Fractured Log Cabin.
This is the most amazing quilt I have ever seen. Because it is two colors and that is it. It does not rely on any exquisite piecing techniques. The quilting is pretty straightforward too. The only trick here is the color gradation and fabric placement. With just that, the quilter has created such a luminous quilt that it is a Shining Beacon for all Quilters!!!
Block Detail
 Simple Design, Two Colors and the Most Extraordinary Quilt!!!

How can you make fabric look like it is lit from within? This is how...


As this show comes to an end, I want to share just two more of my favorites.
Trucks - So simple Piecing, addition of applique circles and the result is cute and clever!!!
Trucks!!!

This is the kind of quilts that I want to make - that bring a smile to your face!!!


And lastly, this quilt composed entirely of HSTs. So much thought and work has gone into this. Every triangle in every block was placed with intention and purpose!!! It is not that I don't want to make something so spectacular. I just don't think, I can. It is much too involved and that is why I bow down to the quilter in awe and admiration for their labor of love!!!

Color Wheel in HSTs

Quilting Detail
 Look at the quilting detail - I am speechless.

So how was your first experience of the Quilt Show, I was asked. What can I say when I feel speechless!!! I came back enriched and humbled at the same time. It was like being in the presence of something that is almost Spiritual - I felt so infinitesimally small and yet I felt like I was a part of the Universe.

I have marked my calendar. Same time, same place, next year.