Sunday, December 17, 2023

Celebrate Diwali

As the daylight hours decrease and the darkness envelops the northern hemisphere, Hindus all over the world celebrate Diwali - the festival of lights. You may have seen the newish British Prime Minister and his family celebrate Diwali at 10 Downing Street.

I have talked about my Diwali Memories and I made my first Diwali Quilt last year. 


This year when Island Batik gave us the choice to make a quilt project "celebrating" our favorite holiday, I knew instantly that I will be making a Diwali Quilt, using a fabric collection called Celebrate!!! Could there be a more appropriate fabric line to make this quilt? 


I started by making candles with two tone flames. All piecing was done using a 80/12 Schmetz Needle and 50 wt Aurifil Thread

Candles


Some height adjustments were made to create interest.

Tall and Short


The next step was adding text.  I marked the center and spaced the letters evenly. 


Marking the Center before placing the letters


I appliqued the letters and stitched them using a simple stitch without a break!  Check the picture below.

Applique


Once that was done, it was time to baste and quilt. I used Schmetz 90/14 Needle and Aurifil 40 wt thread for quilting. The batting is Thermore by Hobbs.

Quilting Lines Marked


And here is my completed Celebration quilt!!! Happy Diwali Mini Quilt finished at 14.5" by 20.5"

Happy Diwali Mini Quilt


Finished Mini Quilt - 20.5" by 14.5"


But wait there is more. Celebrations are always more than one thing and so is this post.  

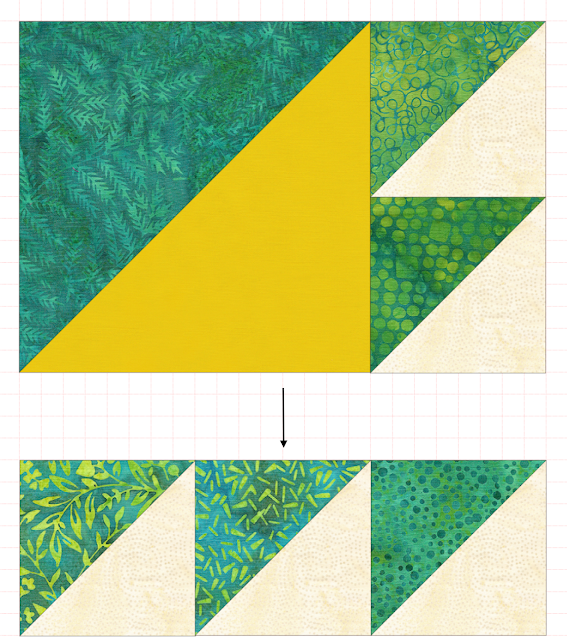
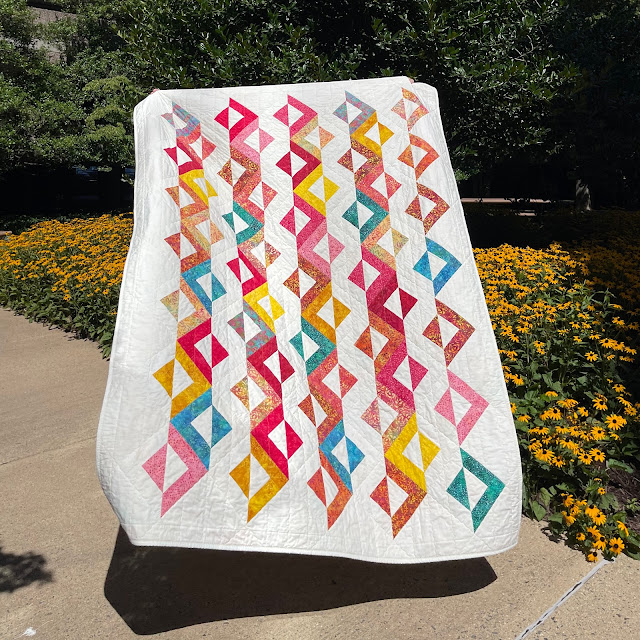
I continued playing with these gorgeous fabrics and made this joyful quilt. I used my Accuquilt 8" GO QUBE to make the smaller half square triangles.  So. Many. Triangles!!! It is good to have an Accuquilt Cutter.

All piecing was done using a 80/12 Schmetz Needle and 50 wt Aurifil Thread

Koi Pond


Finishing at 60" square, I have named it Koi Pond.  Picture this - Colorful fish who ate lots of Diwali sweets (or Christmas cookies) and are now swimming in circles, chasing each other as they burn off their sugar high :-D


Let's get closer. Do you see the little swirls in the background fabric? These fish are creating some serious ripples :-D

Such happy fabrics


The background is Doughnut (Island Batik Neutrals) and the binding is Island Batik Solid Yellow.  I used Schmetz 90/14 Needle and Aurifil 40 wt thread for quilting. The batting is Thermore by Hobbs.


Kissing Fish

True Story - When I was arranging the quilt over the mailbox, prior to taking this picture, a woman stopped her car, rolled down her window and complemented me :-) I was so tickled. I smiled and thanked her. Then I continued smiling the whole day.

But enough about me. What is a celebration without sharing? So here is a free tutorial for you to make your own Scrappy Swirling Fish block. This may be a suitable block for Rainbow Scrap challenge next year. Let me know what you think.

May the holiday season bring you joy and peace that continues into the new year. I will treat every comment like a cherished holiday greeting. Big Squishy Hugs!!!


Swirling Fish Block Tutorial

This tutorial will make two identical fish blocks. 

Background Fabric  - Five squares 5"
Assorted Green Fabrics - One square 9", five squares 5"
Contrasting Solid (choose a color different from background fabric) - One square 9"

Make two large half square triangles - Cut size 8.5", Finished size 8"
On the wrong side of the contrasting solid square (9"), draw a line connecting two diagonal corners. Place the large green square (9") right sides together with the contrasting solid square (9").  Stitch 1/4" away from the drawn line, on both sides. Cut on the drawn line. Press and square both HSTs to 8.5". Set aside.

Make ten smaller half square triangles - Cut size 4.5". Finished size 4".
On the wrong side of a background square (5"), draw a line connecting two diagonal corners. Place a 5" green square right sides together with the 5" background square. Stitch 1/4" away from the drawn line, on both sides. Cut on the drawn line. Press and square both HSTs to 4.5". Similarly make the remaining eight HSTs. 

Arrange and stitch as shown.

STEP 1 - Stitch the four smaller HSTs in two pairs as shown by arrows


STEP 2 - Stitch the large HST to the top HST pair.  Stitch the lower HST pair to the fifth smaller HST.


STEP 3 - Stitch the two pieced units together to complete the block


STEP 4 - Press and square to 12.5"


Do a happy dance, much like the swirling fish :-D Complete the second fish block.

Now make more in all the colors of the rainbow. The smaller HSTs are a great way to use up leftover squares from charm packs. 

Here are a few more examples.

Yellow Fish


Red Fish


Orange Fish


Purple Fish

Nine blocks (arranged 3 by 3) will make a 36" square baby quilt. I recommend adding 2" borders (to protect your points) for a 40" finished quilt.

30 blocks (5 by 6) will make a Lap/Throw/Mercyful Quilt, measuring 60" by 84". Please make sure that you add borders to protect the points.

Questions? Ask away and I will answer here so that all can see. 

I will share this tutorial with all my favorite linky parties. See full list on the sidebar.


Sunday, December 10, 2023

Olivia

Let me introduce you to Olivia.

Olivia likes the outdoors!


She is simple, layer-cake friendly, and suitable for beginners and advanced quilters alike. I used the Buds and Blooms Garden collection to make Olivia.


This is such a beautiful collection with a wide range of values from light yellow, through medium red and orange all the way to deep purple. I love these warm colors. Look for Buds and Blooms Layer Cake in your local quilt store.

Here are some more pictures.

Breezy Day


Glowing Fabrics


Gorgeous Fabrics


To make Olivia, you need one layer cake, one focus fabric and background. I am sure you have a layer cake that is (almost) too pretty to cut up.  Olivia makes sure that your fabric shines while you get a fun and fast quilt in the colors of your choice.


Quilting Detail


Backing, Binding & Label


Finishing at 60" by 84", Olivia is a perfect size for Mercyful Quilts as well as Quilt of Valor. 

Here are a couple of mock-ups in Red, White and Blue. 

Olivia in "Porcelain Blue" Collection with Red (Island Batik Blender) 


Olivia in "Red, White & Blooms" Collection with Blue (Island Batik Blender) 


My detailed instructions show how to distribute the fabrics evenly throughout the quilt, with no two blocks the same.  Olivia is now available in my Etsy Shop. Priced at $10, it is a steal but you can get it for just $8 till December 15, 2023.


Thank you, Paul


I will be by the river, enjoying a picnic with Paul and Olivia. But if you want to win a copy of Olivia quilt pattern, please leave me a comment on this post, mentioning your favorite colors to make this quilt. If you show up as Anonymous, please include your email address. 

I will pick one lucky winner next week. I will be sharing with all my favorite linky parties. See full list on the sidebar.

UPDATE: The two lucky winners are #18 and #39. Emails have been sent.


Monday, November 20, 2023

Nilsa - New Quilt Pattern & Sale

Meet Nilsa. She is my newest finish and a pattern is available now.

At 60" by 83", Nilsa can be a Mercyful Quilt. The pattern can also be used to make a Quilt of Valor.

Nilsa, 60" by 83"

I used the Island Batik collection - Blushing Garden to make Nilsa. 

Have you seen Blushing Garden? It is a beautiful collection with my favorite colors - red, pink and gold. Even a bit of teal to brighten things up. They are beautiful and sunny!


Nilsa Quilt Pattern is now listed in my Etsy Store. 

It is Layer-Cake Friendly. If you have been just petting a layer cake for a while because there wasn't a suitable pattern for it, this is your chance. All you need is about 4 1/4 yards of background fabric. That will take care of all the background, borders and binding. 

Here I go again!


If you wish to use Blushing Garden, you are in luck. It is available in stores right now.  For background, I recommend Egg White from the Island Batik Foundations.

If you'd rather use fabrics from your stash, that works perfectly too. 


The Signature Shot!


Nilsa Quilt Pattern has eight pages of detailed instructions complete with colored graphics, and a full-page Coloring Sheet.  I have also provided step-by-step guidance for on-point setting, showing diagonal columns and how to attach setting triangles.

Love these colors!

Finally, the pattern is 25% off from Monday, 11/20/23 through Sunday, 11/26/23. 

Separately, there will be a storewide sale beginning on Thanksgiving, 11/23/23. 

But wait, there is more. For a chance to win a free copy of Nilsa PDF Pattern (or any pattern of your choice from my Etsy Shop), please let me know in the comments - what is your favorite Thanksgiving side dish? If you are Anonymous or No-Reply, please include your email.

I will pick one lucky winner on Monday, 11/27/23.   
UPDATE - The two lucky winners are Elana and Frederique. Emails have been sent.
Till then, have a safe and happy Thanksgiving!

I will be sharing with all my favorite linky parties. See full list on the sidebar.

Thursday, November 9, 2023

Rooms with a View (PHEW)!

Island Batik's November Challenge and Blog Hop is sponsored by ByAnnie


I chose the project - Room with a View.  I chose to make all three sizes. 


The pattern and all supplies including vinyl, mesh, Soft and Stable, zippers etc. were provided, thanks to our generous industry partners at ByAnnie.

Supplies


I received fabrics from the Morris Mist collection. 


Morris Mist is a signature collection by Kathy Engle for Sherry Shish of Powered by Quilting. 

It should be shipping to a quilt stores in November 2023.


The Fabrics


ByAnnie patterns are very detailed with excellent step-by-step directions.  Once you make a bag/project using these directions, you are kinda spoiled.  They also come with additional videos to guide you through tricky/difficult steps.


Getting Started

The very first thing to do (even before reading the pattern very carefully) was to buy 100 clips. No, this is not an exaggeration :-D You will see. 

Secondly, I changed the needle. A Schmetz Microtex 90/14 Needle is an absolute must to sew through multiple thick layers.

I quilted the fabrics with Soft and Stable. I made bias binding. I made handles - top and sides.


Quilted!


Bias Binding


Handles


Zipper Loops


Yes, the project was challenging. I struggled with vinyl and zipper interface. The vinyl is sticky and the zipper tape is wobbly. It was not as neat as I'd hoped. There was cursing and whining. 

I could not listen to a book/podcast/music during this time. This project required my complete attention.


Mesh Pocket inside the Lid and lots of clips

Each bag has three bindings, one on the lid, second where the lid connects with the body and the third on the base. I am NOT a hand sewing person. Seriously, by the time I get to the binding (for a quilt), I am already thinking about the next project and cannot finish the current one soon enough. So machine binding is my default method. 

But in the case of ByAnnie patterns, I have accepted that it is impossible to maneuver the thick layers under the needle. I can stitch the binding by machine but must finish it by hand. This view is corroborated by other Island Batik ambassadors. After I completed the hand sewing of first three bindings, I was in a foul mood. My thumb and forefinger felt raw and painful.

The fact that there were two more bindings to stitch per bag, six in all brought out the worst in me. I was beyond hating this project. I didn't care about neatness any more. I had a deadline approaching and I was frustrated and stressed.

So I did something that I had never done before. I finished the second binding by machine. PHEW.

It isn't neat but it is done. 

Getting close


My thumb and forefinger thanked me. It was time to attach the base. Could I finish the last binding by machine? I had to try. I started with the small bag. I machine stitched the binding, folded it over and "tried" to finish it by machine stitching it from the front using stitch in the ditch method. I missed the binding around the corners. Removed a few stitches, smoothened the fabric, glued it in place and FINISHED it by machine stitching. 


Small Bag's Base - Kinda Ugly


Of course it is ugly. A war is ugly. In the end the only thing that matters is that I won! No PTSD for my thumb and forefinger. 

The second bag went smoother, slightly. Still missed a couple of places and had to redo.

Medium Bag's Base - Missed a Spot


The last bag went much better; no missed spots. After machine-stitching the binding, I folded it over and glued the entire thing, and then clipped it using about 40 clips (told ya). 


About 40 clips on the base


Then I turned it over and machine marched victoriously (but slowly), needle in the ditch. More or less, you know.  Since I was killing it, neatness be damned.


Finishing Binding by Machine - Stitching in the Ditch


Large Bag's Base - Not Too Ugly, Not Perfect.


The binding is far from neat or uniform. I am sharing this with only you (so don't tell anyone else). If I can manage it, you can too :-) Besides this would be on the bottom of the bag.

There was just one last step - adding zipper pulls. I don't like the fabric pulls. So I found these little beauties for the final flourish in my conquest.


Fancy Zipper Pulls

One more challenge conquered! 

Once the war is over and debris is cleared, there comes the photo shoot and glorious celebrations.

Happy Fall!


Small, Medium and Large


All Lined up!


The Small bag is perfect to store Island Batik stash builders. The fat quarter bundles fit neatly inside the Medium bag. The Large bag is tailor-made for 10" Squares (Layer Cakes). See for yourself.

What is inside?


I am Small & Cute


I am Medium & Pretty


I am Large & Spacious


Rooms With a View


Fabulous Finish!

Paul: Do you still hate this project?
Me (suspiciously): WHYYYYY?
Paul: We are going to see Mom for Thanksgiving. She'd appreciate them, you know.
Me: No, I love these beauties and they are perfect for my storage needs.
Paul (eyes twinkling): That's what I thought.


I will be sharing with all my favorite linky parties. See full list on the sidebar.  

Make sure you check the Island Batik Blog for fabulous giveaways every week! The full list of Ambassadors’ names, collections they will be using in their projects, and their post dates are as follows:

November 1:

November 2:


November 6:

November 7:

November 8:

November 9:


November 13:

November 14:

November 15:

November 16:


November 20: