Showing posts with label attaching zippers. Show all posts

Thursday, November 9, 2023

Rooms with a View (PHEW)!

Island Batik's November Challenge and Blog Hop is sponsored by ByAnnie


I chose the project - Room with a View.  I chose to make all three sizes. 


The pattern and all supplies including vinyl, mesh, Soft and Stable, zippers etc. were provided, thanks to our generous industry partners at ByAnnie.
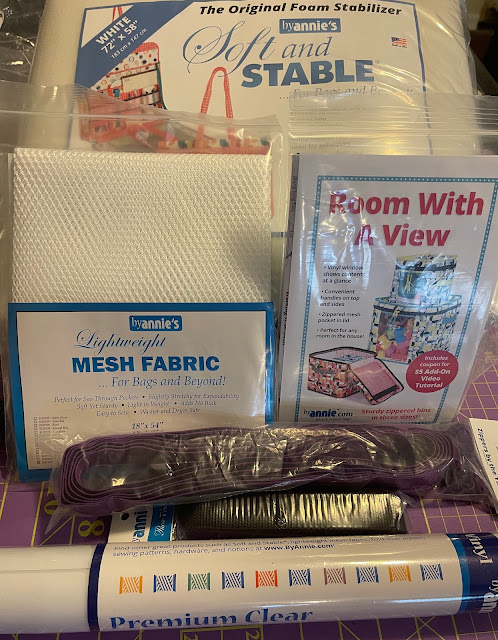
Supplies


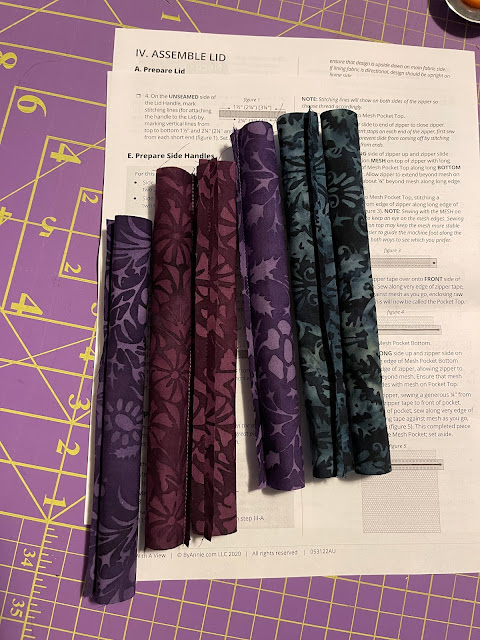
I received fabrics from the Morris Mist collection. 


Morris Mist is a signature collection by Kathy Engle for Sherry Shish of Powered by Quilting. 

It should be shipping to a quilt stores in November 2023.


The Fabrics


ByAnnie patterns are very detailed with excellent step-by-step directions.  Once you make a bag/project using these directions, you are kinda spoiled.  They also come with additional videos to guide you through tricky/difficult steps.


Getting Started

The very first thing to do (even before reading the pattern very carefully) was to buy 100 clips. No, this is not an exaggeration :-D You will see. 

Secondly, I changed the needle. A Schmetz Microtex 90/14 Needle is an absolute must to sew through multiple thick layers.

I quilted the fabrics with Soft and Stable. I made bias binding. I made handles - top and sides.


Quilted!


Bias Binding


Handles


Zipper Loops


Yes, the project was challenging. I struggled with vinyl and zipper interface. The vinyl is sticky and the zipper tape is wobbly. It was not as neat as I'd hoped. There was cursing and whining. 

I could not listen to a book/podcast/music during this time. This project required my complete attention.


Mesh Pocket inside the Lid and lots of clips

Each bag has three bindings, one on the lid, second where the lid connects with the body and the third on the base. I am NOT a hand sewing person. Seriously, by the time I get to the binding (for a quilt), I am already thinking about the next project and cannot finish the current one soon enough. So machine binding is my default method. 

But in the case of ByAnnie patterns, I have accepted that it is impossible to maneuver the thick layers under the needle. I can stitch the binding by machine but must finish it by hand. This view is corroborated by other Island Batik ambassadors. After I completed the hand sewing of first three bindings, I was in a foul mood. My thumb and forefinger felt raw and painful.

The fact that there were two more bindings to stitch per bag, six in all brought out the worst in me. I was beyond hating this project. I didn't care about neatness any more. I had a deadline approaching and I was frustrated and stressed.

So I did something that I had never done before. I finished the second binding by machine. PHEW.

It isn't neat but it is done. 

Getting close


My thumb and forefinger thanked me. It was time to attach the base. Could I finish the last binding by machine? I had to try. I started with the small bag. I machine stitched the binding, folded it over and "tried" to finish it by machine stitching it from the front using stitch in the ditch method. I missed the binding around the corners. Removed a few stitches, smoothened the fabric, glued it in place and FINISHED it by machine stitching. 


Small Bag's Base - Kinda Ugly


Of course it is ugly. A war is ugly. In the end the only thing that matters is that I won! No PTSD for my thumb and forefinger. 

The second bag went smoother, slightly. Still missed a couple of places and had to redo.

Medium Bag's Base - Missed a Spot


The last bag went much better; no missed spots. After machine-stitching the binding, I folded it over and glued the entire thing, and then clipped it using about 40 clips (told ya). 


About 40 clips on the base


Then I turned it over and machine marched victoriously (but slowly), needle in the ditch. More or less, you know.  Since I was killing it, neatness be damned.


Finishing Binding by Machine - Stitching in the Ditch


Large Bag's Base - Not Too Ugly, Not Perfect.


The binding is far from neat or uniform. I am sharing this with only you (so don't tell anyone else). If I can manage it, you can too :-) Besides this would be on the bottom of the bag.

There was just one last step - adding zipper pulls. I don't like the fabric pulls. So I found these little beauties for the final flourish in my conquest.


Fancy Zipper Pulls

One more challenge conquered! 

Once the war is over and debris is cleared, there comes the photo shoot and glorious celebrations.

Happy Fall!


Small, Medium and Large


All Lined up!


The Small bag is perfect to store Island Batik stash builders. The fat quarter bundles fit neatly inside the Medium bag. The Large bag is tailor-made for 10" Squares (Layer Cakes). See for yourself.

What is inside?


I am Small & Cute


I am Medium & Pretty


I am Large & Spacious


Rooms With a View


Fabulous Finish!

Paul: Do you still hate this project?
Me (suspiciously): WHYYYYY?
Paul: We are going to see Mom for Thanksgiving. She'd appreciate them, you know.
Me: No, I love these beauties and they are perfect for my storage needs.
Paul (eyes twinkling): That's what I thought.


I will be sharing with all my favorite linky parties. See full list on the sidebar.  

Make sure you check the Island Batik Blog for fabulous giveaways every week! The full list of Ambassadors’ names, collections they will be using in their projects, and their post dates are as follows:

November 1:

November 2:


November 6:

November 7:

November 8:

November 9:


November 13:

November 14:

November 15:

November 16:


November 20:


Thursday, August 17, 2017

Pencil Me In

It is "Back to School" time, my friend at work mentioned.  She asked me if I'd make a pencil case for her daughter.

One Pencil

Two Pencils

All Pencils

Cool!


 The pencil points are on one side of the bag but the pencils continue to wrap around the bag.

Wrap Around Pencils

After I had pieced the pencils, I used the guidance from my Craftsy class by Joan Hawley to complete this pencil bag.


Did you see the grab tab?

Honestly, piecing the pesky pencils took way longer than actually putting together the bag - interfacing, lining, zipper and all.

Loving it!!!

I received many oohs and aahs from my co-workers. I have not received any more requests for making pencil cases.  That is just perfect because I need to furiously work towards completing my August OMG.

Unless there are other distractions.
That brings me to the Honey Pot Bee - Blended Scraps Block.

These are the fabrics I chose to make the block. Ideally, they should go from lightest tot he darkest. Ideally, the darkness should increase gradually from on to the other.

Yellows

If you are thinking - she is agonizing over this, you are absolutely correct.
Look at the lightest fabric on the right (picture above).  In my opinion it needs to be lighter. But anything lighter would look beige or cream and it still needs to read as yellow, just lighter.


So I chose to use the fabric from the wrong side. I am sure someone else has already done that before me, but I still feel triumphant. What do you think?

See picture below.

Yellows and Beige-Browns
I admit, I am copying Molli's block, but then I am a follower. That is what followers do!!!

Cut up
OMG!!! I am in love with this block. This Blended Scraps saga is not over.  Watch this space.

Completed

For now, I must get back to the August OMG. I will be linking with all my favorite linky parties.

What has been distracting you?  Please tell me I am not alone.


This blogpost contains affiliate links.


Sunday, May 8, 2016

Tutorial - Simplest Zippered Pouch


Meg sent me an email, asking me how I made my zippered pouches.  Here is to you, Meg.
My simple instructions for the simplest zippered pouch.

Lots of pictures with captions explaining the step-by-step process.

Simple Zippered Pouch
Starting Panel - 11" by 6.5"

Matching Strips - 2.5" wide, placed on the sides

Stitched using a 1/4" seam
Trim the completed top - panel + side strips to 12.5" by 11".
Switch to a walking foot.


Layer the top panel, with batting and backing.  Use basting spray to keep them from shifting.

Batting

Backing
Now, you can quilt it to heart's desire.  I quilted zig zag lines over the two seams and then some gentle curves.  See picture below.

Quilted!!!

Trimmed
Zipper Time.
Find a matching (or contrasting) zipper. Change to a Zipper Foot.

Wow, perfect match!

Quilted Sandwich - Folded in half
 Just wanted to see, how the finished pouch will look.  I like it.  Ok, moving along.

Place the zipper, face down and the zipper pull to the left.  Zipper pull to the left. 
Make sure that the Zipper pull is to the left.


Zipper, face down and Zipper Pull to the left.
 Pin in place.  This step is optional.  If you are comfortable with attaching zippers, then you may skip it.  I want to make sure that I am showing all the steps.
Pin in place
 Do you have your zipper foot?

Look at the picture below.  The zipper foot is attached on the left side, so that the bulk of the foot is to the right.  When we are attaching the zipper first time, this is the position we want.

First Stitch - Attach to the left.

Zipper Foot - Attached on the left
 Go slow, making sure that the stitch line is as straight as possible.
Attaching Zipper
 This is how it should look. See picture below.
Zipper - First Stitch Done
 Now, fold the zipper portion and iron it down.  It should look like the picture below.

Zipper attached - Folded and Ironed
Now, we will top stitch the zipper.  Change the zipper foot from the left to the right side.  See picture below.  Can you see that the zipper foot is now attached on the right side and the bulk of the zipper foot is to the left?  That is what we want for top stitching.

Top Stitch - Attach to the right.
Increase the stitch length to 2.4 or 2.6 for top stitching.

Zipper Foot - Attached to the Right for top stitching
Since the zipper is to the right side of the needle, we want the bulk of the zipper foot to the left of the needle.  That is why we change the zipper foot from the left side to the right side.

Top Stitching in Process
 Top Stitched. Yay!!!
Top Stitching Complete  :-)

Are you ready to attach the zipper to the other side of the quilted sandwich?
Yes? Ok, then switch the zipper foot again to the left side.

Fold the quilt sandwich in half, right sides together, so that the zipper pull is now towards you. See picture below.

Attaching zipper on the second side
You can pin, if you wish.  This time, I will skip the pinning.

Quilted Sandwich - Folded, RST
Change stitch length to original 2.2 (or whatever you are comfortable with).  Make sure that the zipper is attached on the left side so that the bulk of the zipper is to the right.  See picture below.


Attaching Zipper to second side
 Once again, proceed slowly, trying to keep the stitch line as straight as possible.

Zipper attached to the second side!
Open the zipper fully now.
Zipper Opened fully. Before ironing
 Once again, fold and iron the just attached portion.
Folded and Ironed
Ready to top stitch one last time.  Increase stitch length to 2.4 or 2.6. Make sure it is the same stitch length as used for top stitching earlier.

Top Stitching the second side
There is a lot of bulk under the foot. So proceed slowly, trying to keep the stitch line as straight as possible.

Top Stitched

This is the time to do a short happy dance, because you have completed the most difficult part of this process. YAY!!!


Zipper Attached and Top Stitched

Close the zipper and position it on the top of the pouch.  See picture below.

Zipper on Top

Now, move the closed zipper down from the top to about one inch towards you.  See picture below.

Why, you ask.  Well, if you make the pouch with the zipper on the top, it creates a lot of bulk on the corners where zipper ends going the seams.   If you move the zipper a bit to the inside, like in the picture below, that bulk is then avoided.

Zipper offset to the inside
Pinch the fold on the top of the pouch and place a pin on the inside, along the pinched crease.  See picture below.

Place a pin at that crease
Half close the zipper and turn the pouch inside out.  Place another pin on the other side of the zipper.

Zipper half Open, Pinned in two places

Now, we are ready to finish the pouch.  Put on the walking foot once again. Leave the stitch length at 2.4 or 2.6.  Once again, there will be a significant amount of bulk under the walking foot.

Walking Foot - Once again

Stitch, using the walking foot, and 1/2" seam on other sides of the pouch. See picture below.

1/2" seam
 Whip it around and stitch again.

Stitched twice

One side done
 Repeat on the other side.

Stitched both sides!!!
 Trim the excess zipper ends from both sides.

Trimming excess zipper

Trimmed
Almost done.  Just one more step.  To avoid bulky corners, clip away tiny triangles from the seams. See picture below.

Trimmed Corners to reduce bulk

Now, turn your finished pouch right sides out, press  and admire.
Needs to be Ironed

Zipper Closed
Do you see how beautifully the print above the zipper matches with the print below the zipper?
I am doing a happy dance right now :-D


Dainty & Useful 


The finished pouch measures 5.25" by 10.5" and it can neatly fit this set of combs.  You have a simple zippered pouch!!!

If one is good, two must be better. Right?
Here is a bonus zippered pouch for you.

QAYG Zippered Pouch

I started with batting 10" by 12" and backing 10.5" by 12.5"
Batting - 10" by 12" 
 Layer the batting and backing.  Spray baste to keep the layers from shifting.
Batting and Backing
Now, comes the fun part.  Dive into your strips scraps bag and pull out a few skinny strips - 1.5" wide.  We need one strip 2.5" wide by 10" long.

Place the wide strip in the center of the batting+backing.

Add the skinny strips on both sides. Stitch using a 1/4" seam.  Flip and iron.
Repeat till the entire batting/backing are covered.

Gorgeous colors!!!
Trim the quilted sandwich and follow the same process of attaching zipper as in the Simple Zippered Pouch.

In this case, I left the zipper on the top.  See the bulky corners?
Keeping this one
So, the process (and size) of the quilted sandwich is different.  But the steps of attaching the zipper are identical. If you wish, you can use just one piece of top fabric to make your quilted sandwich.

Mine Mine Mine!!!
 The bright purple zipper makes it pop :-)
Pop of Purple

Do you like it?  Are the steps/instructions/pictures clear?  Meg? Are you there, Meg?
Tell me all your thoughts.  Your comments make me happy :-)


How happy?  Like this design wall below.

Work in Progress - Color Splash on my Design Wall
Peach, Pink, Orange, Coral, Fuchsia, Blush & Tangerine!!!

These are the colors in my new quilt - a work in progress. Furiously in Progress.
Must finish by May 30th.  Details when complete.

I will be linking with all my favorite linky parties.
-----------------------------------------------------------------------------------------------
June 23, 2016 UPDATE
Diana of Little Penguin Quilts used this tutorial to make a perfect little zippered pouch for her sewing supplies.  Do check it out!!!