Showing posts with label Snowball Block. Show all posts

Sunday, July 30, 2017

Respectfully Yours

Let's call him Clay, although that is not his real name. He was intimidating when I first met him.  And remained so for some time.

Finished!!!
Clay was gruff in his manner, rarely smiled and was blunt to not just me, but everyone.  He just had no time for niceties.  By and by, I realized that he is an excellent manager, razor-sharp, no-nonsense, very knowledgeable about the project and extremely supportive of his team.

Kaffe Fabrics

Folded Squares for Snowballing

Purple & Green

Backing Fabric

As a new employee, I had my fair share of challenges.  One time, as I was trying to understand the history of the project, I sought one of the managers' permission to attend a particular meeting.  The manager extended the invitation to me.  I attended, listening in rapt attention.

Basting

There were several other senior team members in that meeting.  One of them sent an email to Clay, asking what was I doing at that meeting.  Clay's response was - Trying to do her job. 
In short, Clay defended me and told this person to let me be.

Quilting in Process

Clay's favorite color is purple.

Reddish Purple Binding

One day, as he signed my timesheet with his signature purple pen, I asked him.  Do you have more of those purple pens?
He opened his drawer to show me three boxes containing a dozen pens each.
I thought you are going to retire soon. Why do you need so many of them?
We both laughed!!!

Almost there

One day,  I asked him if he would join me for lunch.
He declined, mentioning that he was on a diet.
Few weeks later, I asked him - How's the diet working out?
Not good, he responded.

Labelled

Cookies are his shortcoming, I believe.
Me: I saved you a cookie
Clay: Just one? I can't eat just one.
We both laughed.

Finished Size - 76" by 98"

In my yard

I see stars

Me: I just ate one and I will eat the second one, if you decline.
Clay: Do you want to?
Me: No, I made them and I saved this for you.
Clay: You did. Well, then I will have to get it.

Loving the colors


Colorful!!!

He has been threatening to retire for over two years now. I knew I had to make him a quilt.
The next part (choosing the color) was easy -  Purple, of course!!!

Ready for Picnic?

All rolled up

I don't think Clay is aware of my blog or my interest in quilting. So I feel safe sharing this with you.
Also sharing with One Monthly Goal and all my favorite linky parties.

Respectfully Yours
This is my tenth quilt of the year and the second queen-sized one.
What have you been up to? I'd love to know, as usual.

Friday, July 7, 2017

Purple Pickle

A new quilt is in the works and it must be done by the first weekend in August. Therefore I am making it my July OMG.

Pattern and Initial Fabric Pull

Sometimes I pick a pattern and choose fabric accordingly.  And sometimes there is some fabric that I have to use.  In this case, it was the color purple.

Kaffe Fassett Design Roll Strips

Well, the quilt needs to be purple. Purple is a difficult color. I have very limited purple in my stash.

Voluptuous? I can work with that :-D

My best bet was Kaffe Fassett.  I had a couple of design rolls - 6" by WOF strips.
And that became the starting point for the quilt. Now, let's select a pattern, shall we?

Basket Case

If I stitch a 2.5" strip on either sides of the 6" strip and cut into squares, I should have my blocks. Arrange in a rail fence fashion and there is your pattern. Simple and Purple.
But but but there is not much fun in that. I have already made quilts like that.
Remember Basket Case.

Life's Embrace

An elongated 4-patch block with sashing, arranged in rail-fence style.  That is Phoebe's flower box from MSQC. I have already made that pattern - a few times.

Phoebe's Flower Box

As I am considering these patterns, I am aware that they have to be suitable to the pre-cut at hand.

6" Strips - Green, Purple and a touch of Yellow

If you are ever in this mode (trying to decide a pattern) do not , I repeat firmly - DO NOT GO TO PINTEREST.  You will see a thousand other things and forget the original mission.

No that did not happen to me. I did not see this quilt from Kitchen Table Quilting.
Ok, I did and was immediately fixated on it. Time to sketch.

Sketch

Adding Color

In Process

I am in love

At this time, I realized that it would not work with my pre-cuts. Bummer!!!
Time to modify the design.

Final Design

Instead of a 9-patch, I modified it to a 4-patch, while the snowball blocks remain the same.
The pattern will have 63 blocks, arranged 7 by 9.  There will be 32 4-patch blocks and 31 snowball blocks.

First Block :-)
Design - Check.
Fabric - Check.
Let's go to town.

Off to a Good Start!!!

I feel like I am off to a good start. Hope I can maintain the momentum. What do you think?
As usual, I'd love to hear from you.

I want to take this time to thank you for your lovely, kind, sweet, heart-warming and very generous comments on Playing Footsie.  Sending big hugs to you for the love you shower upon me :-)

Wednesday, May 14, 2014

Serendipity...

According to Wikipedia, Serendipity means a "fortuitous happenstance" or "pleasant surprise". 

The Colors
Every time I make a mistake, I learn something. Occasionally, I will go back and fix it. Most of the time, I just let it be - my unique signature in the quilt-making process :-D
And once in a blue moon, I will find something - something amazing, exciting and totally unexpected - SERENDIPITY

Sometime ago, in response to a question on a quilters website about snowball block, I responded with a comment. The conversation went like this.
Me - Oh, you can get the same effect by using the tube technique.
J - Oh, yeah? Well, show us if you think so.
Me - I will. Next week. I am busy now.
J - No problem. I'll wait.

So, I tried the tube technique to achieve the said snowball block. Not quite the result I expected. But I found something else. Today I am sharing with you that serendipitous find!!!

Fabric Requirements:
2 strips of fabric (one light and one dark) each 5" wide by WOF.

I used solids (see picture above) for dark and white for the light.

Directions
1. Fold the  dark strip of fabric, right sides together, along the length. Iron it to create a crease along the entire length.
Creased Strips

2. Repeat for the light strip of fabric.
3. Stitch together the two strips, along the length, RST. Press open the seams. Be careful to not press the creases flat, see picture below.
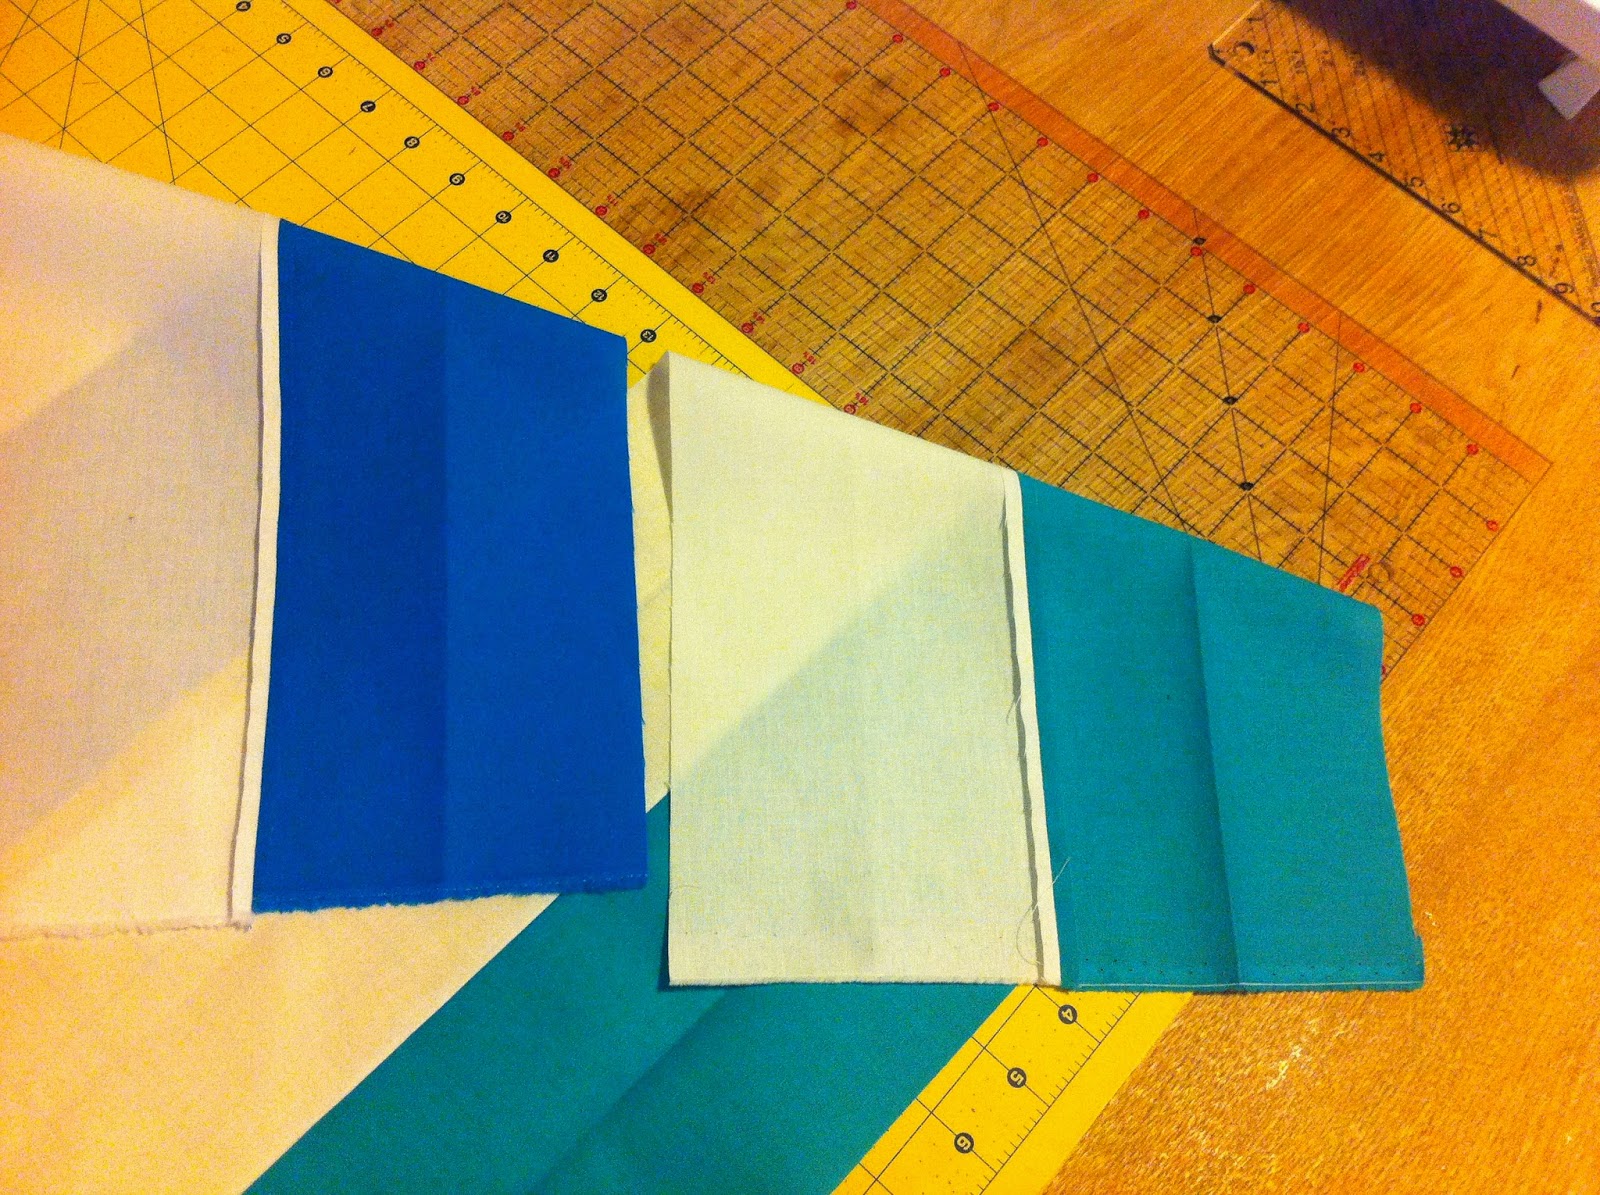
Stitched once and Seams Pressed Open

4. Stitch the two strips on the other side to form a tube. Press seams open. Maintain the  creases. Your finished tube should look like this picture below.
Completed Tube, seams in the center (ready to cut)

5. Lay the tube flat, with the open seams in the center. Now, you see why making those creases in the beginning was so vital - it keeps the tube flat on your cutting board.
6. Using a 45 degree ruler, cut out triangles. I made six tubes with six solids+white


7. From one tube you should get eight squares - 4 with dark centers and 4 with light centers. Each square measures about 61/4 inch.

Does this block have a name? I am going to call it Half Snowball Square (because the snowball effect is only on two out of four sides).  Let us divide them into two piles - the dark centers and the light centers pile, see below.

Half Snowball Squares (HSS) - Dark Centers 
Half Snowball Squares (HSS) - White Centers 
So what is the serendipitous part, J may ask. Well, there are at least seven different layouts that can be achieved from these blocks. Yes, seven!!!

Dark Centers Layout
1. All blocks going the same way - Diamonds
Dark HSS - Diamonds

2. Xs and Os
Dark HSS - Xs and Os

3. Zig Zag
Dark HSS - Zig Zag


Light Centers Layout
1. All blocks going the same way - Whimsy

Light HSS - Whimsy

2. Jewels (This is the same layout as Xs and Os above, but the focus here is the center and hence the name Jewels)

Light HSS - Jewels

3. Silly Goose (because some are flying one way and some are going the other way - that is what Jenny said!!!)
Light HSS - Silly Goose

Now, I know there is someone reading this blog and saying - Oh no, I just want to make one quilt, not two. For those who want to make just one - here are  few layouts using both dark and light centers blocks.

1. Zig Zag - Plain Jane
Mixed HSS - Plain Jane Zig Zag

2. Zig Zag - Crazy Daisy
Mixed HSS - Crazy Daisy Zig Zag 
3. Very Crazy Zig Zag
Mixed HSS - Very Crazy Zig Zag (all mixed up)
4. Bow-Ties - This one is my favorite...

What about the snowball effect?
Looks like this passion of mine is snowballing into an avalanche of quilting happiness!!!

So, here is my question for you - which one of these layouts is your favorite?