Showing posts with label Academic Quilter. Show all posts

Sunday, September 4, 2022

Prizes, Prizes, Prizes!!!

Today, the Positivity QAL comes to an end with the announcement of the winners. 


Thanks to the unexpected generosity  of our sponsors - Art Gallery Fabrics, Benartex and Island Batik, we had enough prizes for everyone who completed a Positivity Quilt.

Here are the winners:

Mari, Lisa T, Katie May, Roseanne, Sue Hoover, Danielle, Cynthia, Sylvia, and Wendy F.

Emails have been sent to all winners. While I wait for your addresses, I am stuffing goodies in padded envelopes. So excited!!!


Sunday Update - Prizes have been sent to Katie May, Roseanne, Sylvia and Sue. Mari and Lisa have received their prizes. I drove north to meet with Mari and Lisa. Totally worth it!!!

Congratulations to all of you and thank you so much for making this QAL a success.

Thank you, Bernie. You are my partner in crime.

Thank you Mari. You keep me sane.

Ladies that Lunch - Lisa (hand only) and Mari


Hello Lisa. You are my new quilty friend. What else do I call you if you begin with cute fabrics and end with peach tart?  

From Lisa, for me!!!

Peach Tart +Vanilla Ice cream = Taste of Summer

We happily ate with vanilla ice-cream :-) A perfect way to celebrate summer and the end of a successful QAL.


In other news, Angela has announced the color for September and I just might complete my blocks before the end of the month. Here are my fabrics - at least a start.

Rainbow Scrap Challenge - September is Bright Blue


Island Batik has announced the Tool Talk Challenge and Blog Hop. Check the IB blog for the complete schedule and fabulous giveaways.  


I have completed the flimsy and will begin quilting soon. I am working with Honeycomb collection, an absolutely yummy collection designed by Kathy Engle for Jackie Kunkel of Canton Village Quiltworks, coming to a fabric store near you in September.

Gorgeous Fabrics!!!


Work in Progress


I will post on September 14. Will there be a giveaway of my own? Hmmm... only one way to find out :-)

Sharing with all my favorite linky parties. See full list on the sidebar. 

Hope your long weekend is just as peachy and sweet.  

Sunday, May 8, 2022

Mari's Star - Tutorial for Hands to Help

Mari was feeling overwhelmed. 
I was only too happy to lend a helping hand. After all, this tutorial is for Hands to Help :-)

If you have a layer cake in your stash, that hasn't found a perfect quilt, this is for you. Usually Layer Cakes have 20 fabrics, two squares of each fabric for a total of 40 squares. Of course you don't need a layer cake to make this block. 

This tutorial is in two parts. In Part 1, we will make the four identical units. In Part 2, we will look at ways to make blocks from those units.

PART 1 - Making the units

Focus fabric 
One square 9.5"
One rectangle 5" by 10"
(Or you could use two identical squares from a layer cake, as shown in the pictures below.)

Background 
One rectangle 5" by 10"


10" square of focus fabric (if using a layer cake square)

1. Cut the 10" square of focus fabric (if using a layer cake) into half for two rectangles 5" by 10". Set one aside.

Cut into half, two rectangles 5" by 10"

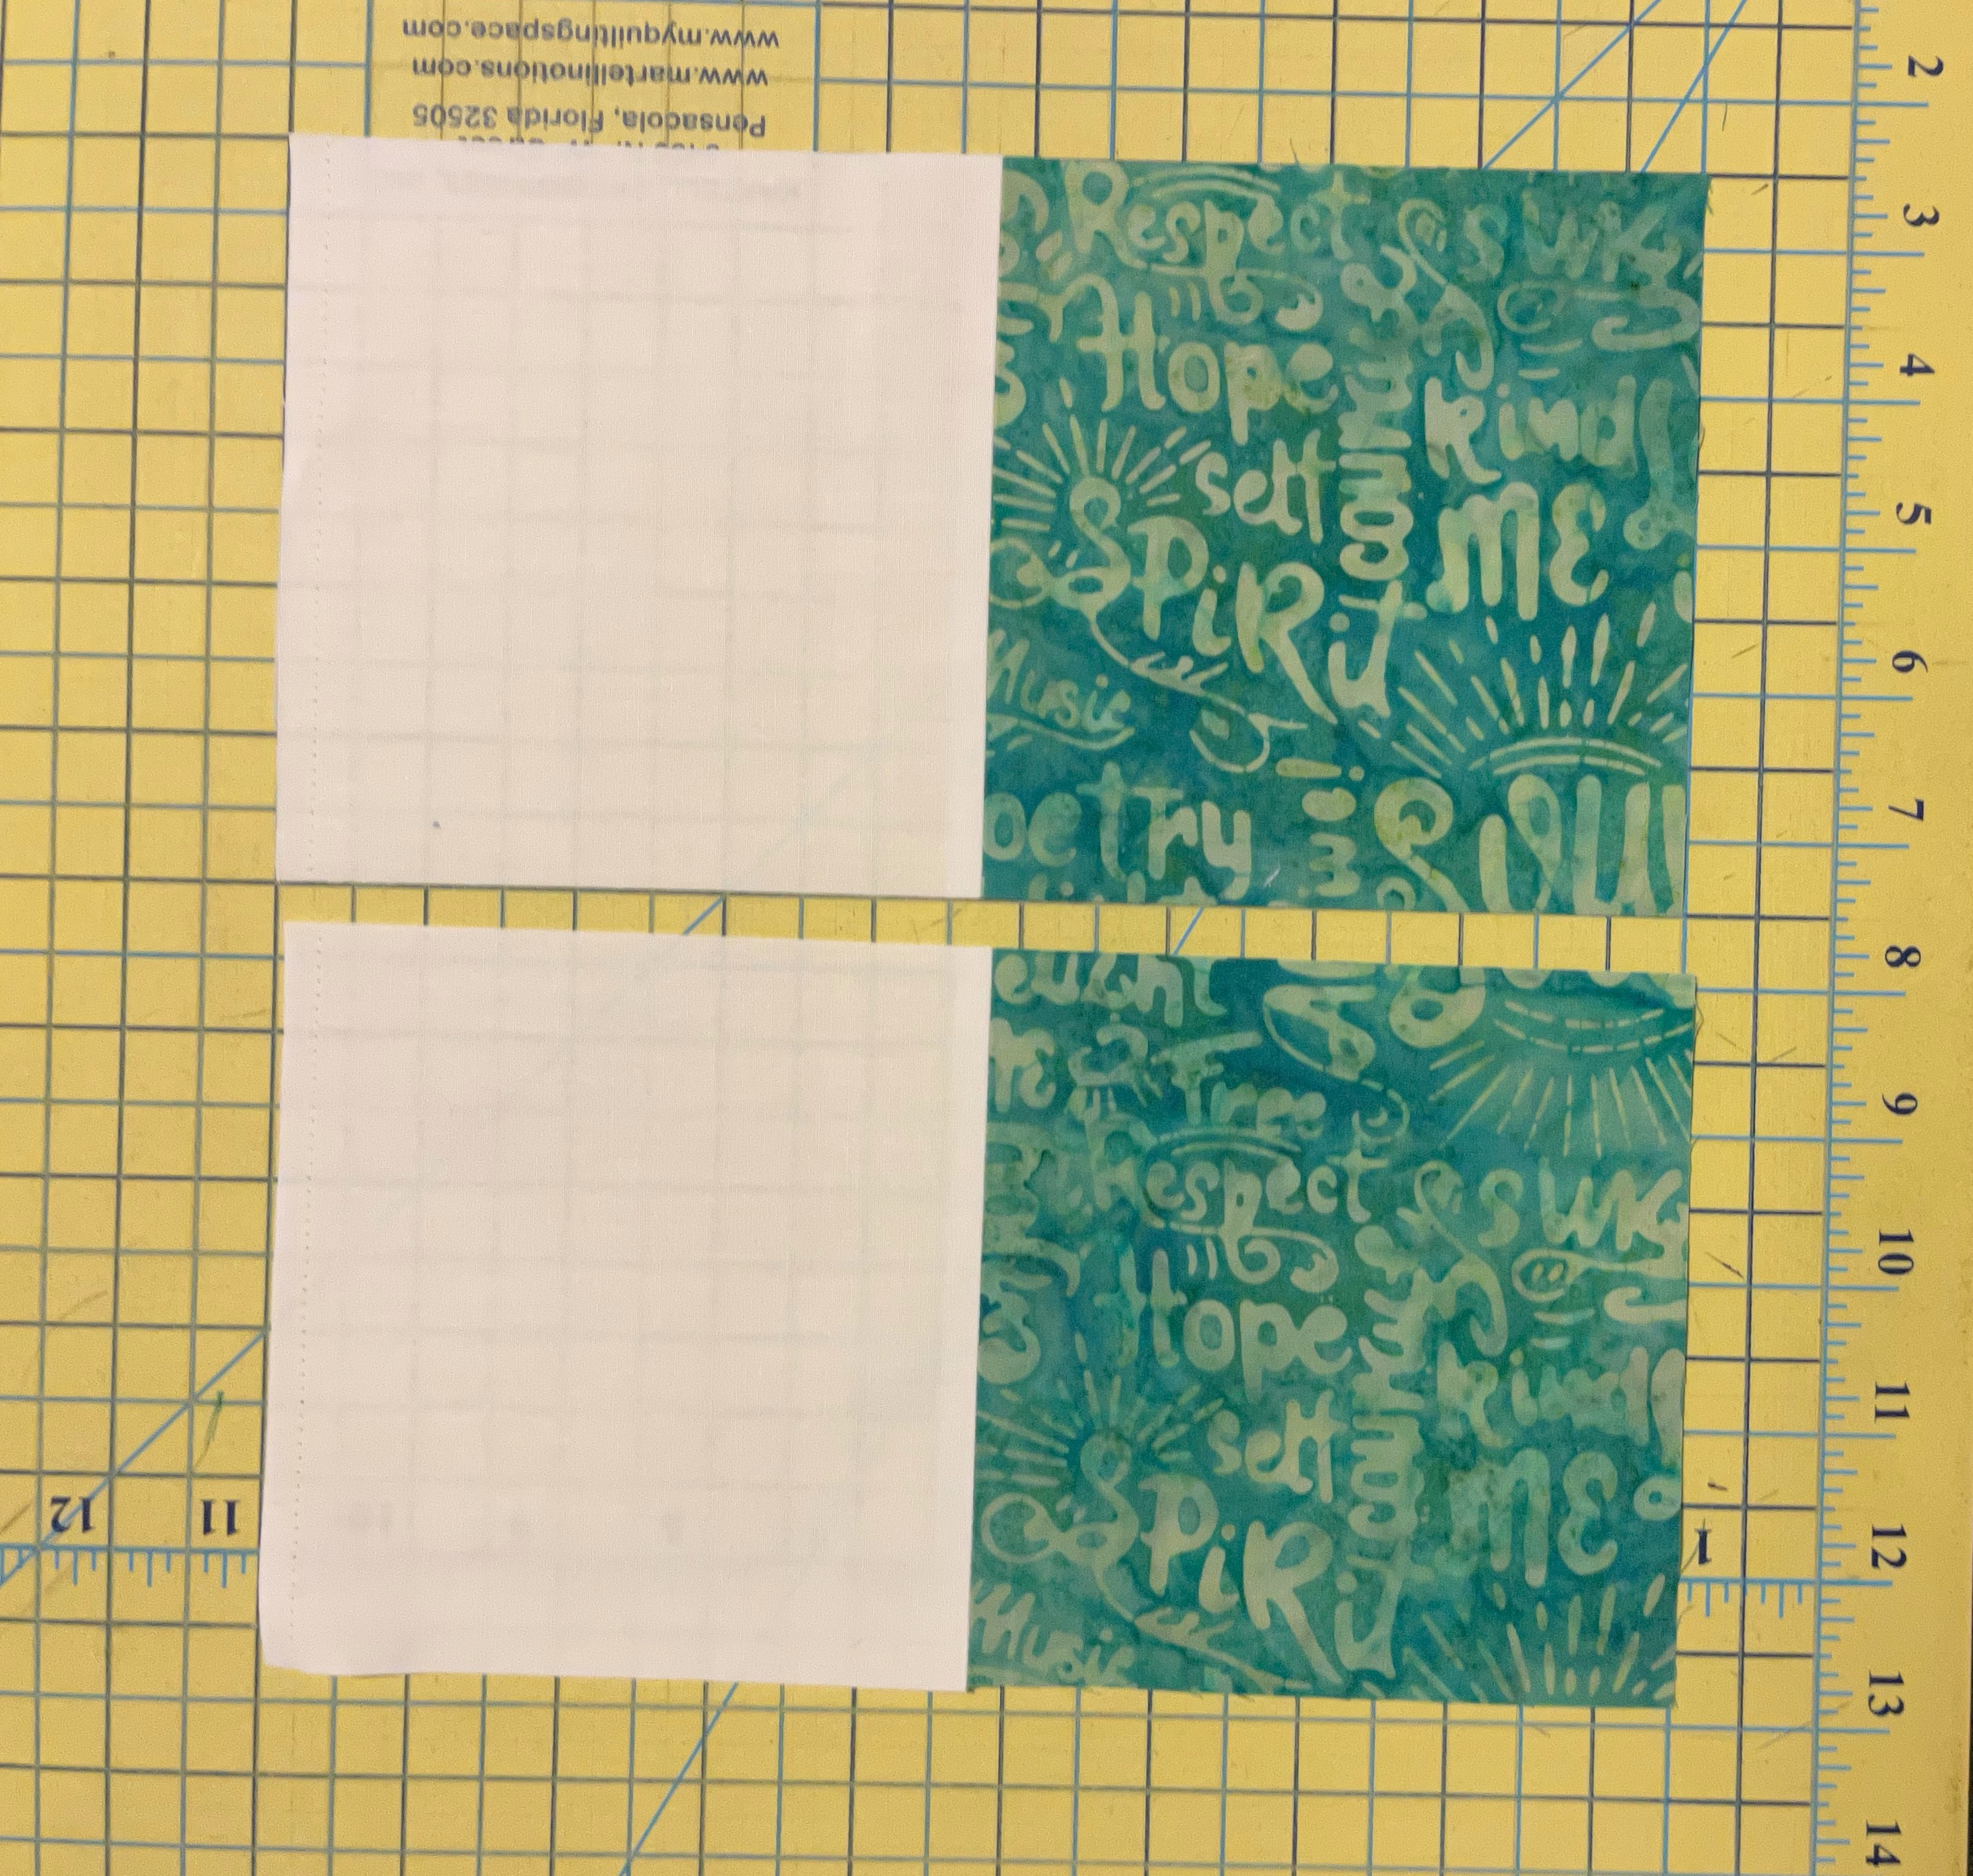
2. Pair the other rectangle with a 5" by 10" rectangle of background fabric and sew along the length. Press seams open.

Focus Fabric Rectangle paired with Background Rectangle

Stitched and Pressed

3. Cut this unit into half as shown below. Turn around one half and stitch together to make a 4-patch block. Press seams open and square to 9.5".

Cut in half

Turned around

4-patch block, 9.5" square


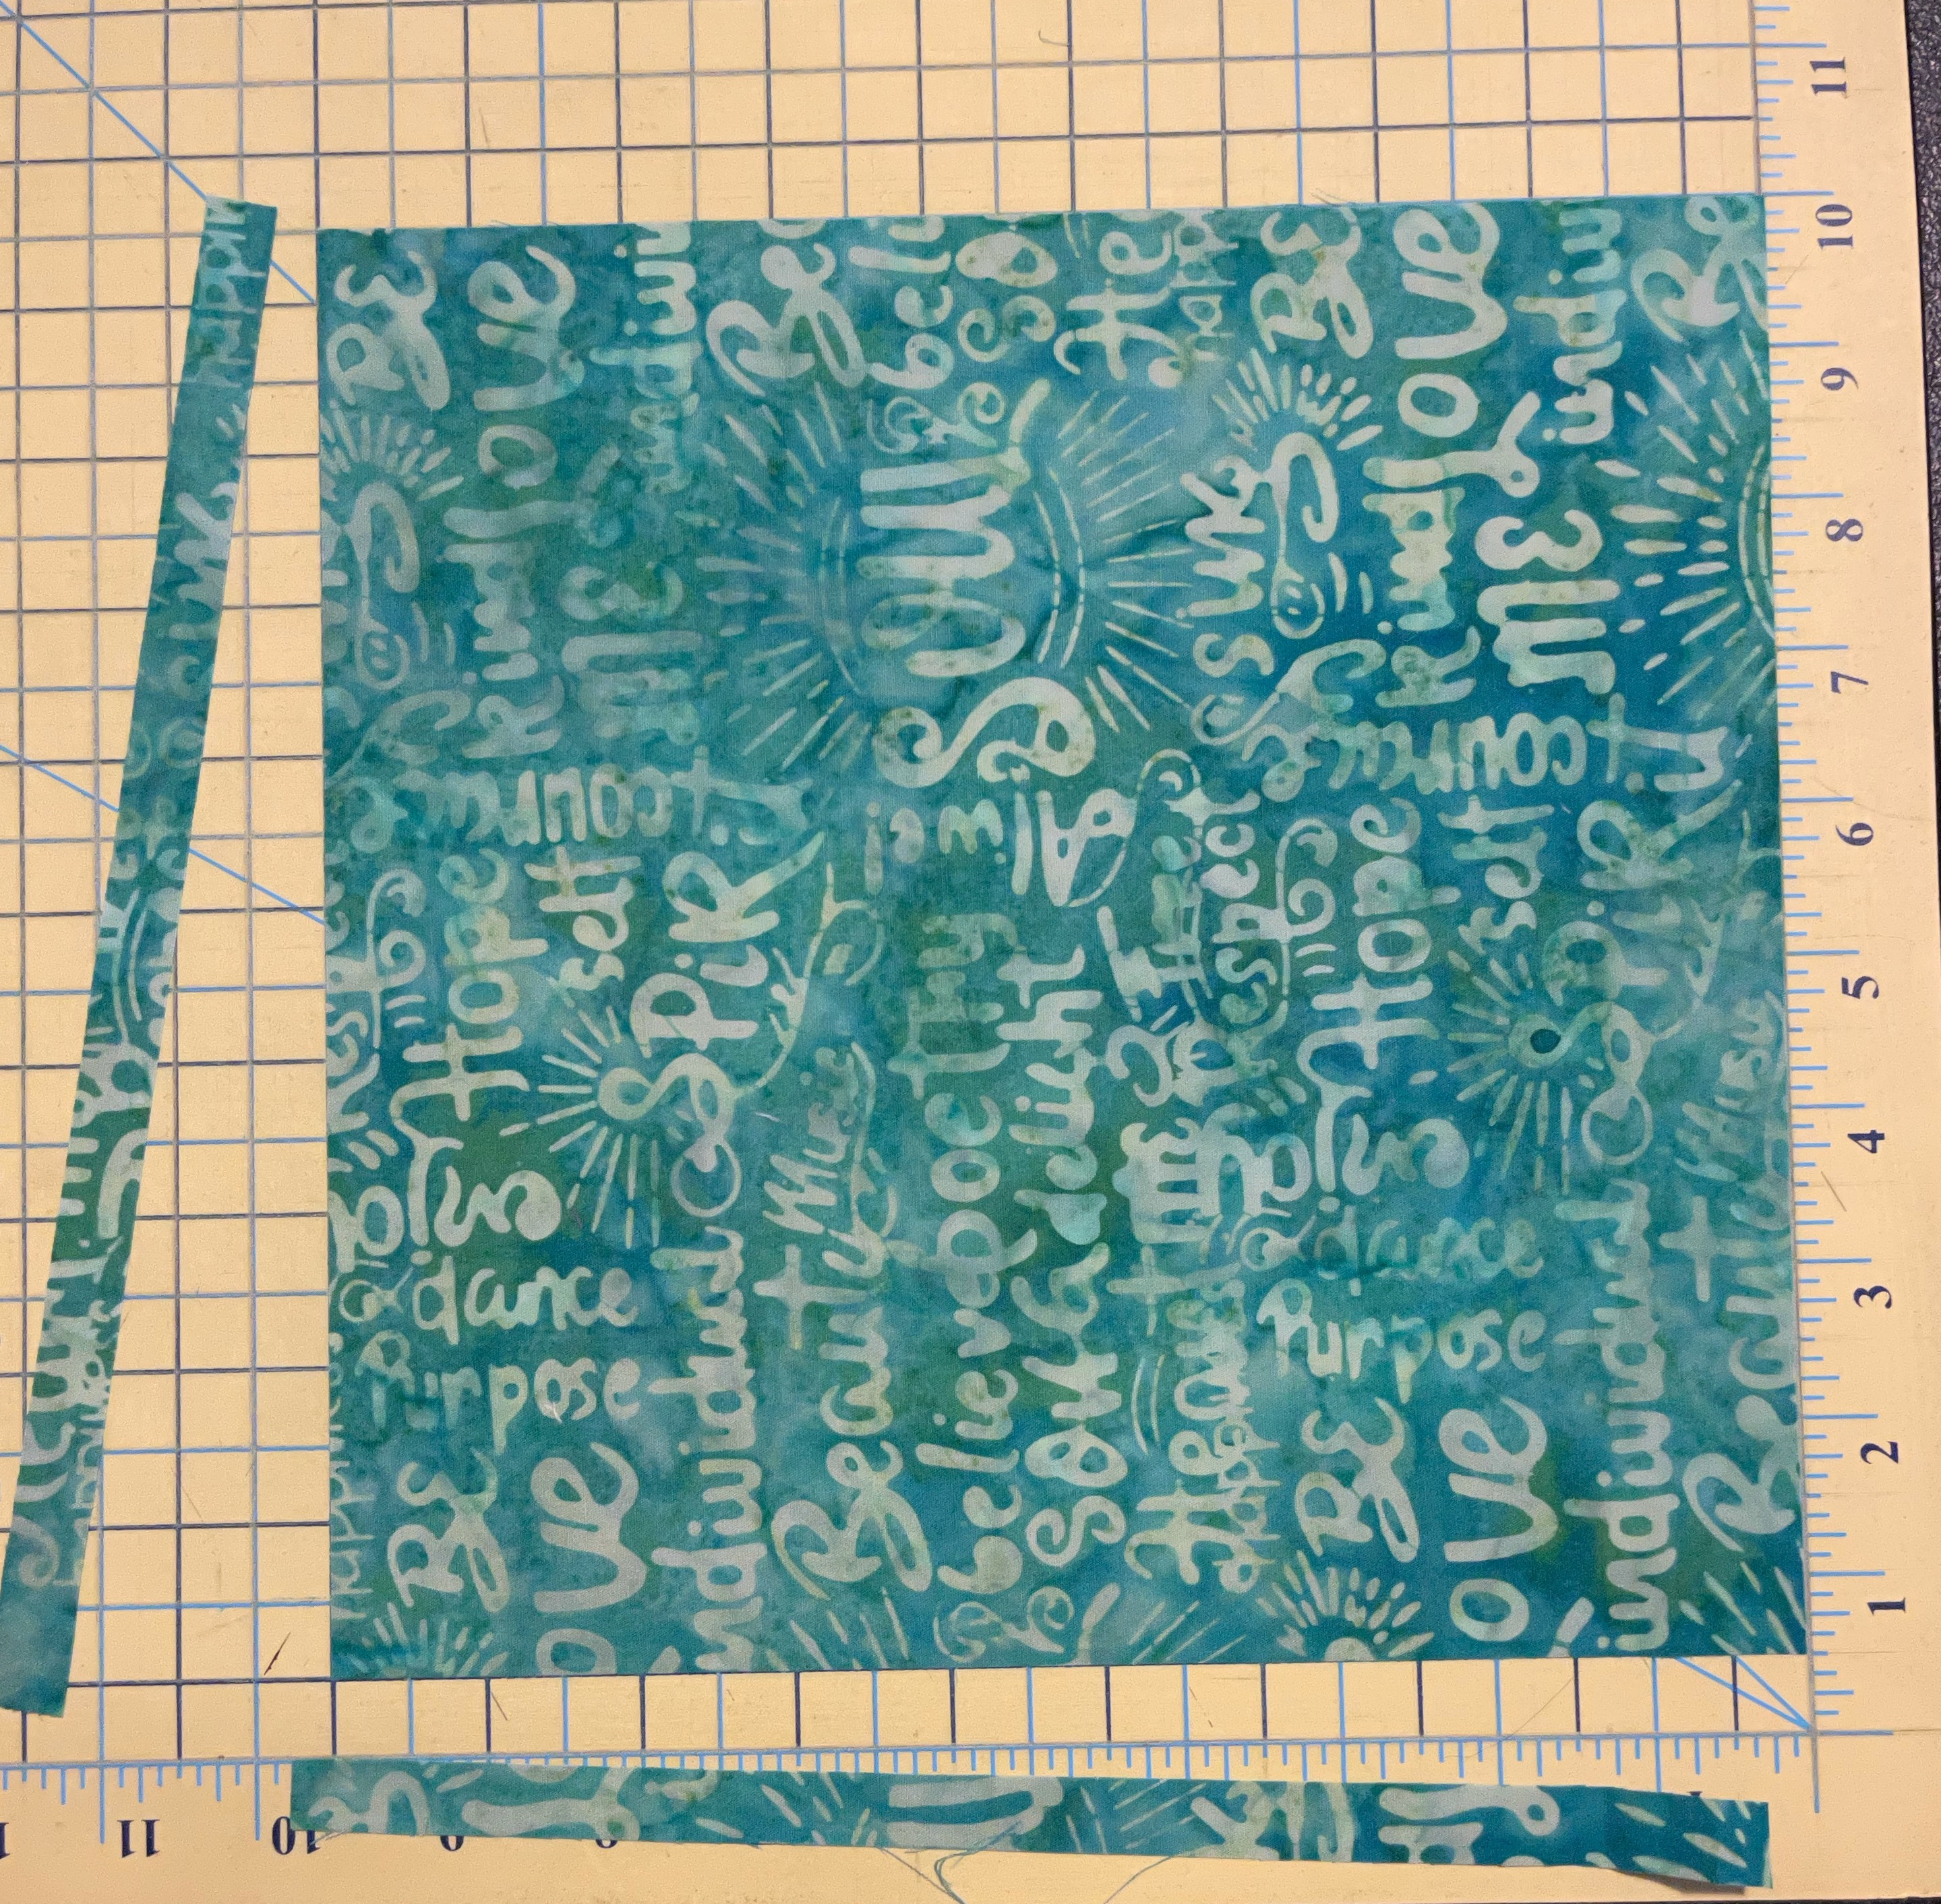
4. Take the 9.5" square of focus fabric and place right sides together with the 4-patch block. Stitch along all four sides. Cut on both diagonals to get four units.

Trim to 9.5" square (if using a layer cake square)

Place right sides together with the 4-patch block

Stitched on all four sides

Cut on the diagonal, twice

5. The next step shows how to trim these units. 
  • Align the diagonal seams of the block with the 45 degree lines on the cutting mat. See picture below. Your block should lie fully within a 7" square on the mat.

    Align the seams with the diagonal lines on the mat

  • Trim the two sides first, making sure that you trim exactly half inch inside from the edge of the 7" square. 
Trim sides first
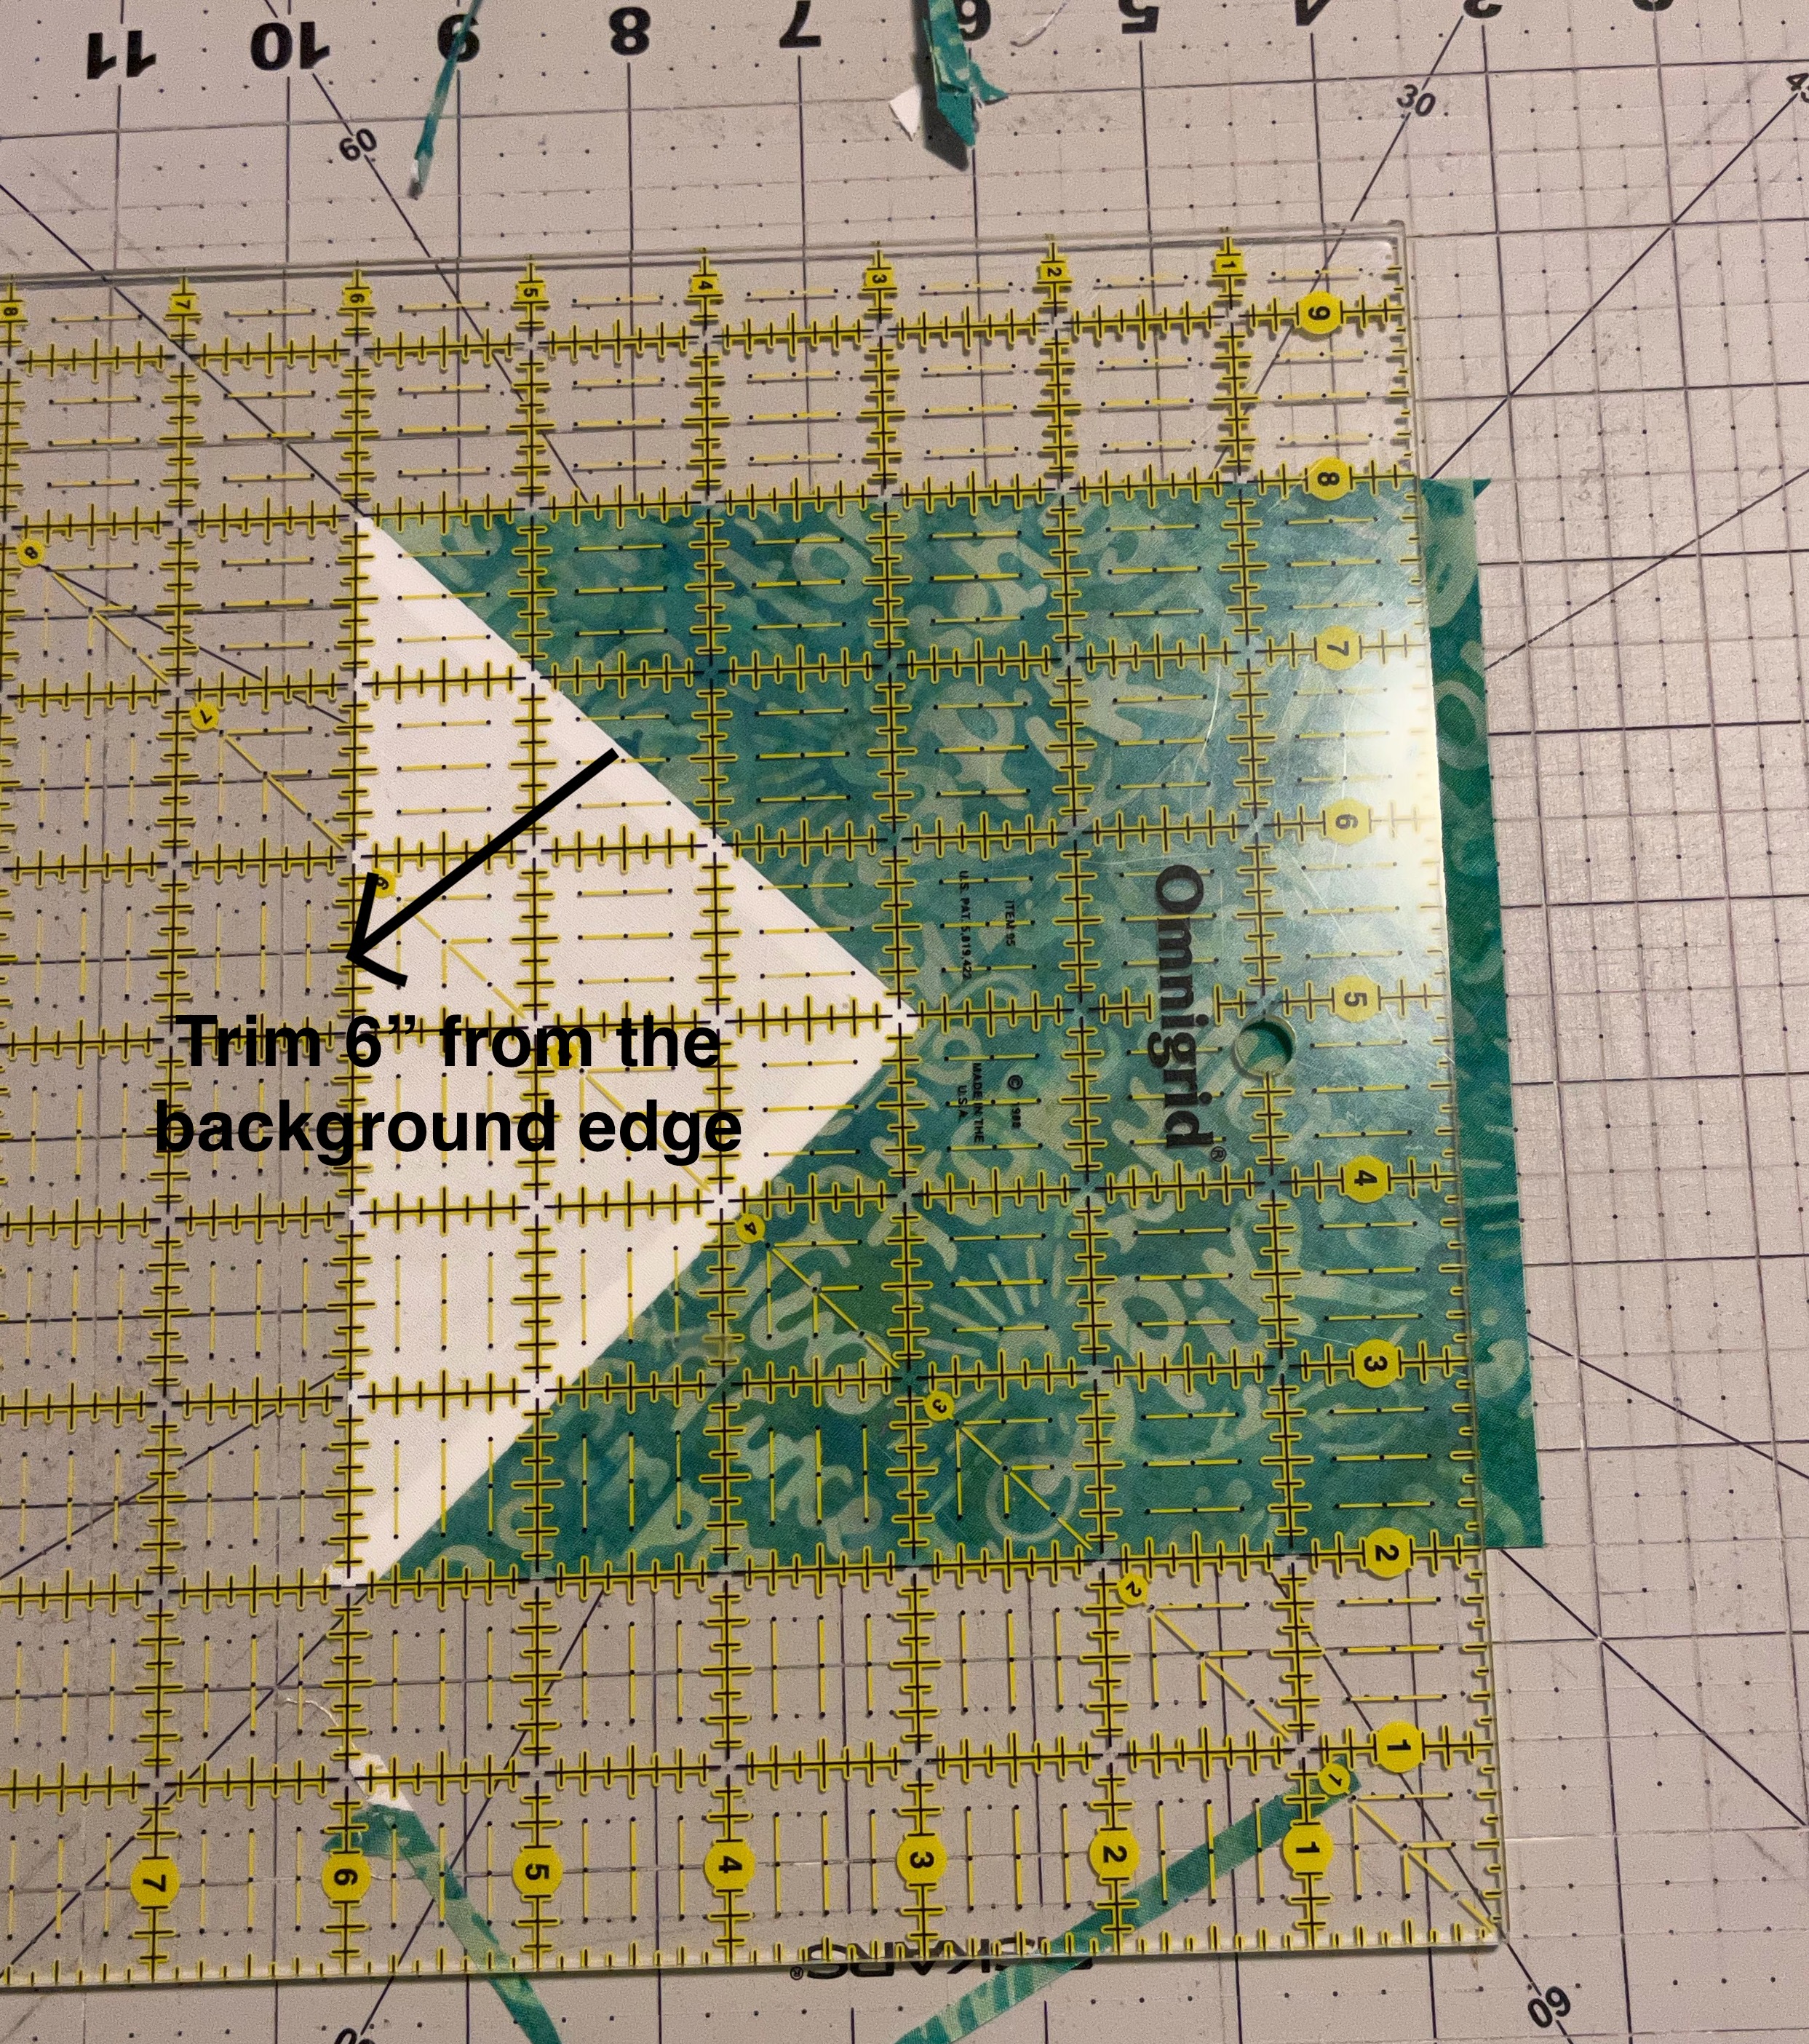
  • Then trim exactly 6" from the background edge of the unit. See picture below.
Trim 6" away from the background edge
  • Do not trim the edge with the background fabric. This is very important, if you wish to maintain your points. 
Similarly trim all four units. 


PART 2 - Assembling the units
There are two basic ways to assemble these four units. We could arrange them in a 4-patch or in a 9-patch. See options below.

4-patch options (11" finished block)
Pinwheel


Swirl


In my opinion, this Swirl Block looks dense in the center. If you agree, you can snowball the inside corners, as shown in the following two pictures.  

Swirl with Snowballed Inside Corners

Swirl with Bowtie Center

Other options with four units continue.

Diamonds

Peaks and Valleys


Arrange them as shown and sew like a 4-patch. Square to 11.5". 


9-patch option (16.5" finished block)

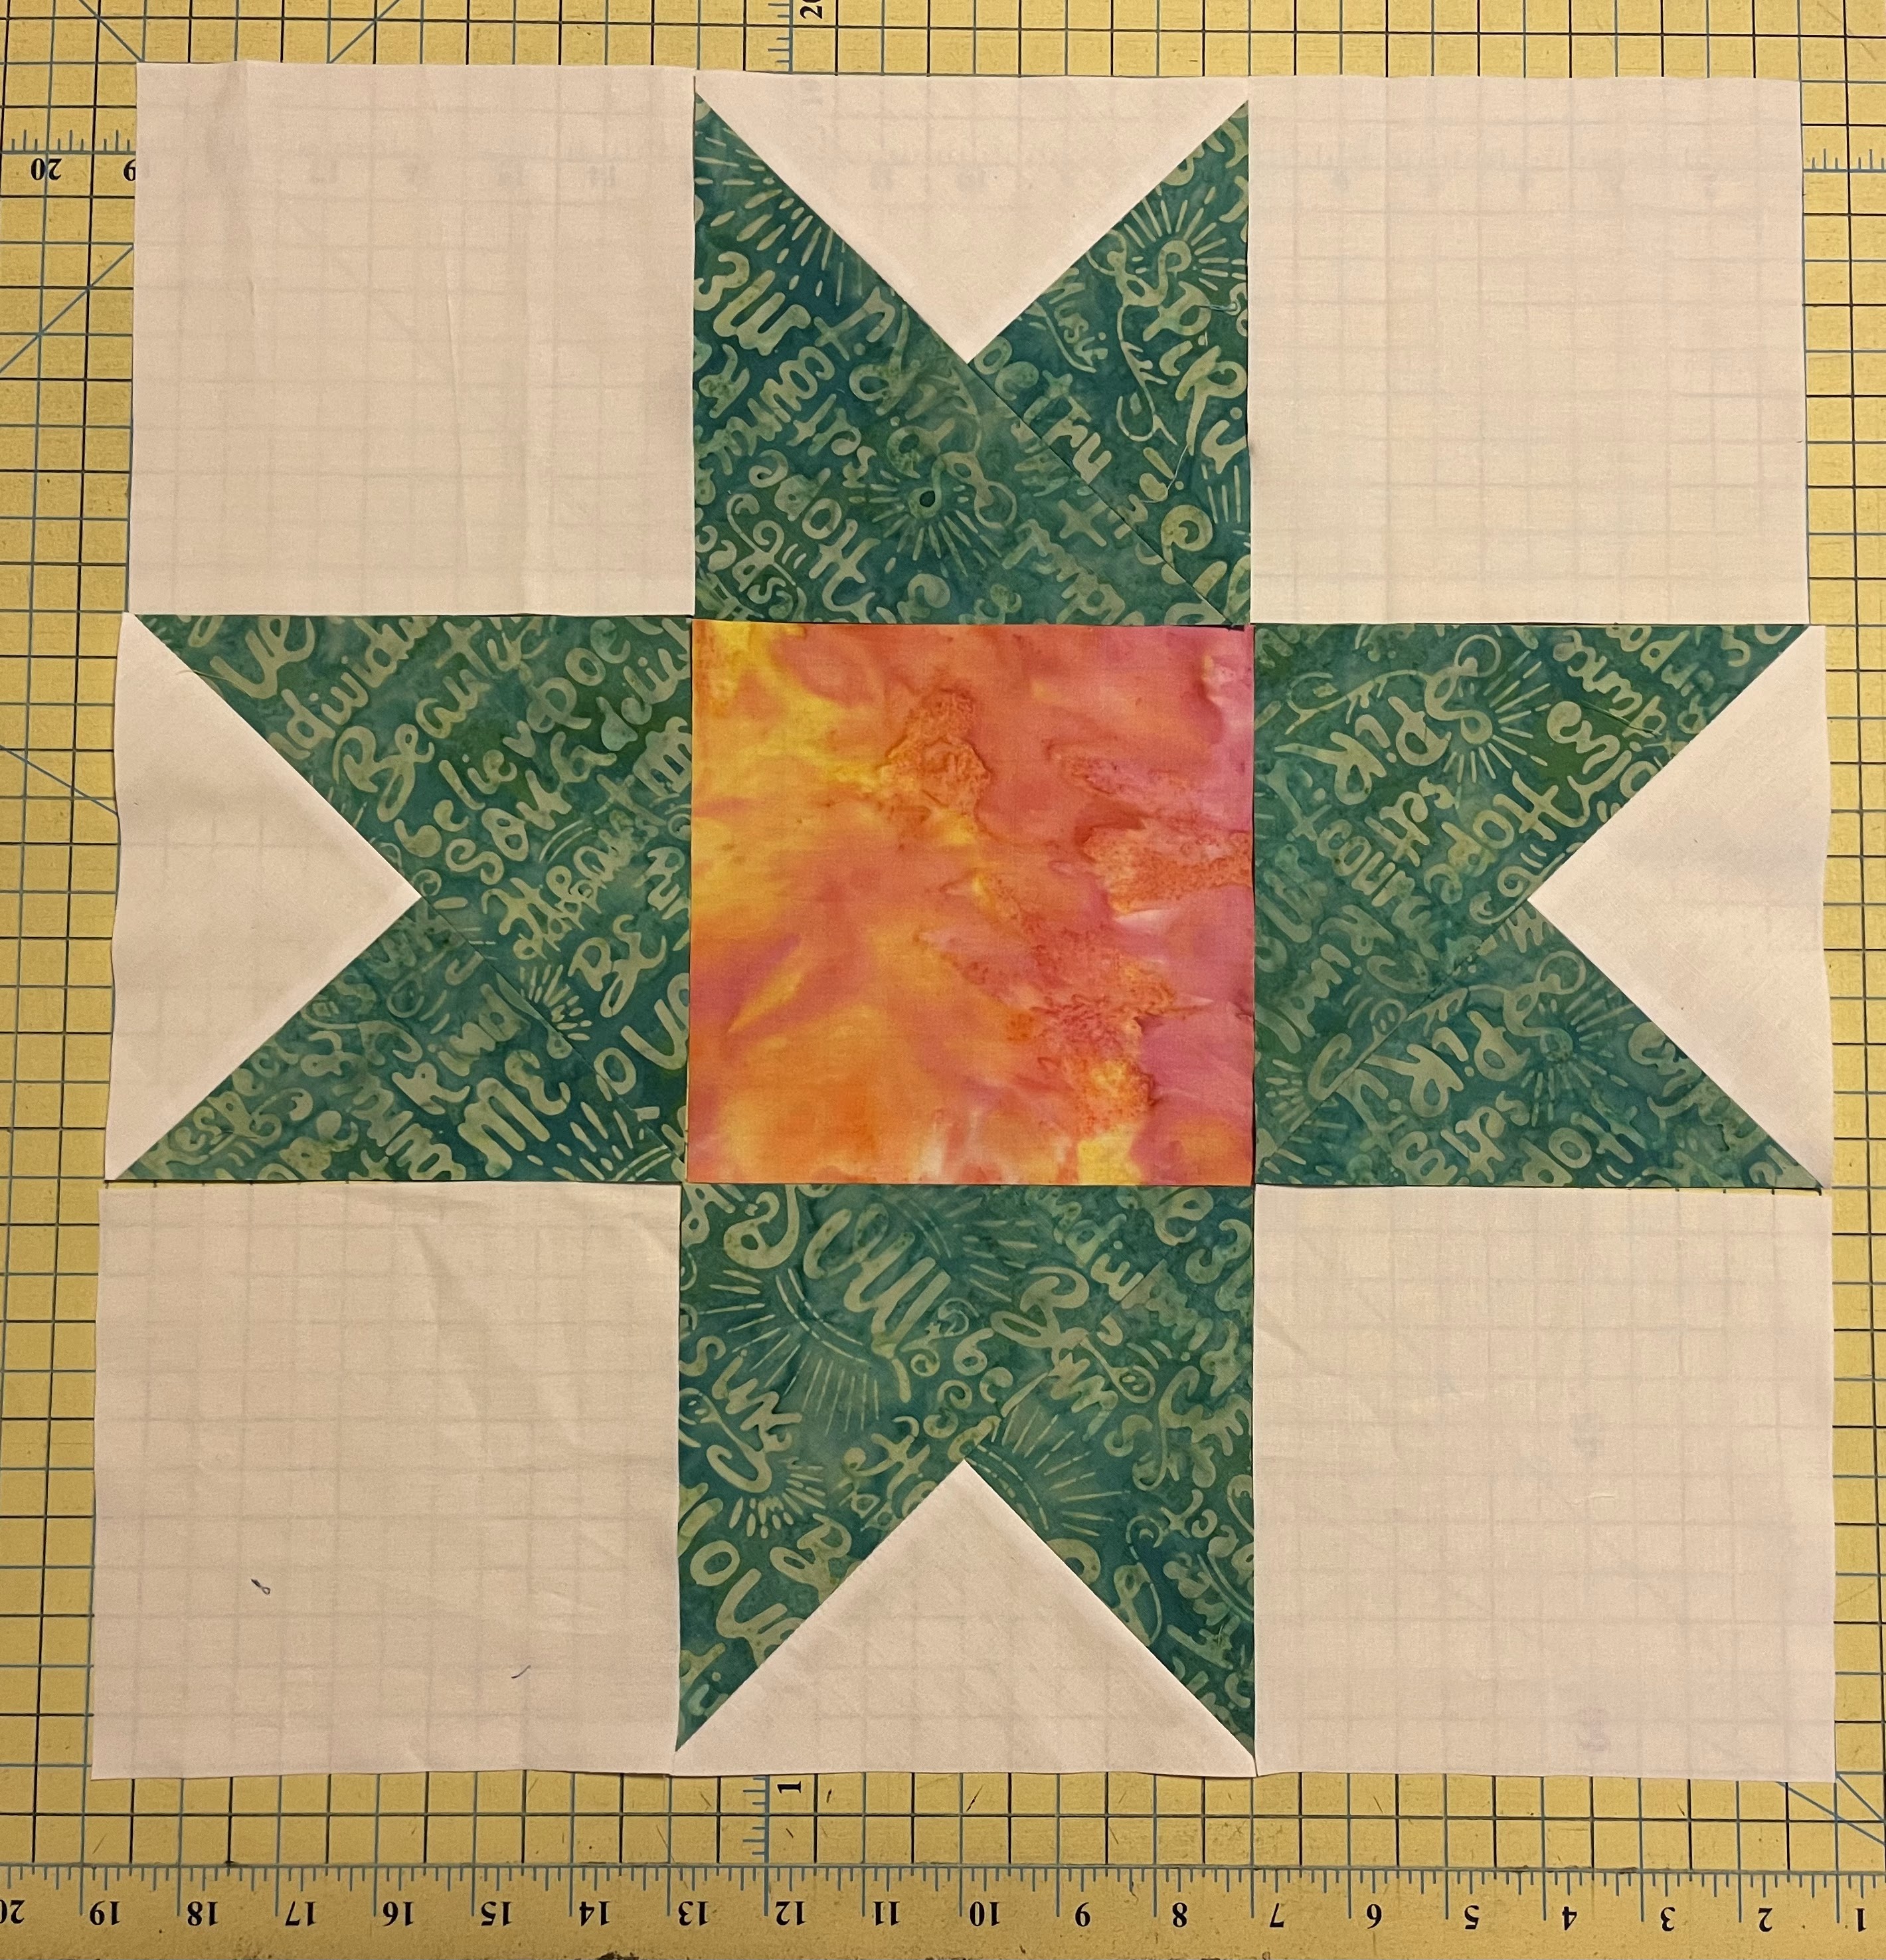
Using the four units and four background squares (6") plus one square of contrasting fabric (6"), arrange as shown.

Star Block

Pin at the seams and sew like a 9-patch block.

Pinned

Square at 17"

Points safely away from the edge

If you followed the cutting instructions, you will notice that the star points are more than a 1/4" away from the edge, ensuring that they will not be cut off even when you sew a full 1/4" seam.

This is my favorite block to make from this method. Do you have a favorite? 

Please note that since the blocks are on a bias, there will be some wonkiness. It is okay to be imperfect. 

  • Nine blocks (arranged 3 by 3) will make a baby quilt. 
  • 20 blocks (4 by 5) will make a Lap/Throw/Mercyful Quilt.

Questions? Ask away and I will answer here so that all can see. 

Wednesday, August 1, 2018

Motivated by Mari

Mari made a quilt - Misfit Toys.

Misfit Toys is now going to AQS Quilt Show in Virginia Beach!!!  Mari shared this fantastic news with me on Friday. I jumped with joy for her.

With Mari

She gushed, I listened.
And in that moment, I knew I had to drop everything and make a quilt using up my leftovers - bee blocks (Honey Pot Bee) and orphan blocks and audition blocks.

Sandra and Elizabeth

I met Elizabeth in Buffalo. She mentioned a quilty term that I had not hear before - Coping Strips.
When the blocks are of varying sizes, she adds strips to the smaller blocks to bring them to the requisite size. These strips are aptly named coping strips.

Now, some folks call them sashing but I believe sashing is used with uniformly sized blocks.
See you can use sashing strips after you have used coping strips to make all blocks uniform :-D

I needed coping something but I chose to use coping blocks (also used coping strips in two places). Or you could call them filler blocks. The Charlie Brown+Snoopy block is a coping block. The improv slab next to it was leftover from Fire Pit, used also as a coping block.

Coping Blocks - Charlie Brown, Cool Leftover Slab from Fire Pit, Warm QSTs


I made coping blocks from leftover triangles discarded from Curry Favor (picture above) and from those leftover from making Doggone Cute blocks for KaHolly

Yellow Gray QST is a coping block using leftovers from Doggone Cute blocks

The leftover blocks from Charmed Encore worked perfectly as coping blocks.

Coping Blocks - Framed Charm Squares, 4 HSTs, and a house
I also used a coping strip to bring the red tree block to size. See picture above.
Simple 4-patch blocks made perfect coping blocks, sometimes used singly sometimes in a series.

4-patch blocks, used in a series - left corner

There were some composite HSTs leftover from Animal House. They became houses with mix and match roofs. I tried the same pattern in a larger size. Did not work.  Kinda loses its appeal in that size.

Here they are - three modest houses and one Mac-mansion.

Three modest houses and one Mac-Mansion - UGH

I loved the Blended Scraps Block so much that I made a whole quilt - Shadow of Light. The first block from that endeavor is near the top left.

Finished Flimsy

My experiments with paper-piecing are all here - the black/red/yellow star that was a moderate success, the very pointy 1.5 star, the Tall Tales book block which was a huge success, the two mushroom blocks where I used freezer paper and the As-You-Wish block (envelope+letter) which I declined to paper piece.

Paper Piecing Adventures - Star Blocks and Mushroom Blocks

The lattice block next to the tree block also came from the Honey Pot Bee. As did the Pantry Jar block and the Star Kisses block.

Star Kisses block from the Honey Pot Bee

The BHQ Economy Square Block had me whining because it has 81 pieces in just one block.

The 81 piece Economy Square Block

Before I wrote my most popular tutorial, I made an audition block in purple and red. It finally found a place in here.

Audition Block - Purple Red and Cream

I enjoyed making the strawberry block. Made in three colors. You can see the red one below. Saving the pink and orange ones for the Quilt Guild BOM later this year.
Did not enjoy the Echo block. This was a perfect place to get rid of it, but if you love it here is the link to the tutorial.

The Strawberry (love) and Echo (hate) blocks

This flimsy also has one of the discarded blocks from The Queen's Necklace (top row), next to the leaf block, which I loved so much that I have made several. Yes, they will make a quilt - just not yet.

Leaf, Kaleidoscope and Tall Tales Blocks. Pantry Jar, As You Wish and Tree Blocks
In the picture above, there is a coping strip (with a snail) next to the leaf block. I recently got that sliver of a fabric in the scrap bag that Sandra brought for me when we met in Buffalo!!!

This is one quilt with so many stories!!!

Some posts are laden with pictures. This one is definitely laden with links. I am trying to give credit where credit is due. It is possible that I missed some. If so, please ask and I will supply the link/inspiration in the comments.

Thank you Mari - I started because of you.

Thank you Sandra - I completed it because of you. So that I could make it to this Dreami party.

Lots of color = One Happy Quilt

Who has inspired you lately? I'd love to hear from you. 
I will be liking with all my favorite linky parties, see sidebar for full list.

_____________________________________________________________________

OOPS!!!
I almost forgot. Here are the winners from the giveaway.


1. Solids Kona FQ Bundle to Dottie Bishaw (#30) and Gran Chris (#52)
2. Four warm prints FQs to Kristin (#74) and four cool prints FQs to Frederique (#5)
3. Pink/red scraps to Lisa Marie (#10) and Blue/green scraps to Clare M(#80)

Emails will be sent to the winners later today, unless you are a no-reply blogger, in which case please send me an email. If I do not hear from you in a week, you will forfeit your prize and I will pick someone else.

Thank you so much for celebrating with me. Big hugs to you!!!


Tuesday, June 6, 2017

Quilt Show and Bragging Rights

I had such a fabulous weekend that I am still reliving the experience through pictures.

Paper Doll Mini Quilt

Mari drove from Delaware so that we could go the Quilt Show together.  She brought me fabric (scraps I requested) and my own paper doll wall hanging.

Juicy Scraps

We ate lunch. Her generous compliments on my culinary skills made me blush and she ended up with leftovers :-) That is a win-win situation.

My Twitter Feed on display at the 44th Quilters Unlimited Show

At the show, I posed with my quilt and beamed with delight  every time I heard appreciation for my work.

Beaming
There was no dearth of eye candy at the quilt show.
We lingered, took pictures and discussed techniques and patterns. Here are a few of my picks.

Happy Fish by Barbara Delaney
These fish are just the kind of blocks that make me happy.

Farm Girl Vintage by Kelley Davis
These vintage blocks are super adorable. Bet there is never a dull moment in making these blocks.

Hand Pieced by Jeanne Culbert
Jeanne is in my Quilt Guild and I am overawed by her patience to put together this beast of a quilt  -all hand pieced!!!

Blue Ridge Beauty by Jennifer McKinney
And here is Jennifer's scrappy beauty. This is her second Blue Ridge Beauty. She made one as a wedding present for her niece. 

The House that Kaffe Built by Denise Racz
I noticed that most houses have yellow windows depicting that the family is in, and a few have black windows, showing that the occupants are out.  Love such attention to detail.

Daryl's Seascape by Madaline Stutes
Meticulously paper-pieced fish make this quilt a favorite.

The Nana & Kyra Quilt by Nancy Fallone
When Nancy's  18-month old granddaughter Kyra saw her piecing, she was fascinated. Every visit, she would pick two squares and hand them to her nana to sew them together, resulting in this quilt.

Mari joined me in chai and samosas after the show. Our discussion of fabrics, patterns and tutorials nicely rounded out my day. So exhausted but very happy.
________________________________________________________________________

May I brag a little? Or a lot?


On Sunday, Janet Marney of Quilters Unlimited of Northern Virginia called me to ask for my permission to use My Twitter Feed as the group photo of their Facebook page.
I asked her if she could hold the phone for a minute...while I did a happy dance and finished running around in circles around my coffee table.
Then we both laughed.
Here is the link - https://www.facebook.com/groups/304623407466/
________________________________________________________________________

If May was crazy busy, June offers little respite.  As a result I have fallen behind on my Honey Pot Bee blocks. Must finish those in June.

Fabric Squares for the June Block

Me: How is that for June OMG?
Inner Voice: Small but doable.
Me: Well, then let's complicate it a bit.
Inner Voice: No don't
Me: Why not?
Inner Voice: Because you also have to write the BOM tutorial for the Birds block
(I am the Block of the Month Coordinator for my Guild this year and I have been ASKED to provide the Birds block tutorial)
Me: Huh, and I cannot do both?
Inner Voice: You also have to MAKE the Bird blocks for the BOM.


Fabric pick for the Bird Block
Me: YIKES!!!
Inner Voice: Like I said.
Me: No, you will not discourage ME. If I do not achieve my goals that is one thing but to NOT EVEN TRY - that is UNACCEPTABLE!!!

Yes, sometimes Paul is asleep (or out) and the conversation must go on.

For my June OMG, I have a flimsy that is screaming to be quilted and I will get it done. Here is the backing and binding. No, I am not showing the front till it is finished.

Backing & Binding

Three goals for June
1. Finish a quilt
2. Make Bird blocks and write the BOM tutorial.
3. Get up to speed on the Honey Pot Bee blocks.

I will be linking with Elm Street Quilts for the June OMG.

Here is the fabric I ordered from Connecting Threads. At 40% off, I am pretty pleased with it :-)
Joel Dewberry Fabrics 
So, how have you been and what are your June goals.  I will be linking with all my favorite linky parties and as usual I'd love to hear from you.

This blogpost contains affiliate links.